

What keeps us on the road here
Rot settles into wood long before it ever shows on the surface. Beaverton sits on flat valley floor, the Tualatin Plains, where rain has nowhere steep to run toward, so instead of rushing off a slope it sits against foundations and soaks slowly into crawlspaces until the ground underneath a house rarely gets a real chance to dry out. On the older single-family streets of North Beaverton, original siding and trim have weathered decades of that lingering dampness. On the newer townhome rows going up in South Beaverton, the gap between buildings is often barely wide enough to walk through, which starves a wall of the airflow it needs to shed moisture after a storm passes. We trace the water back to where it actually got in, open up everything it touched along the way, and rebuild the wood underneath before any new material goes back on. It is the single most common call that comes through our door.
Licensed and insured. Oregon CCB #262707
On anything sent before 5pm
We match or beat most written estimates
Remodels completed
Thirty-six to forty inches of rain a year would not be considered extreme most places, but on ground this flat it lingers near a house far longer than the same rainfall would on a hillside lot. These are the spots that moisture reaches first inside a Beaverton home, and what we end up opening up the most:
The corner boards, the casing wrapped around every window and door, and the band trim partway up the wall absorb the worst of a Beaverton winter before anything else does, and the sheathing hiding behind them is usually where the real extent of the damage shows up once a board finally comes loose.
Soft decking, joists and beams that have lost their grip, and the ledger bolted straight into the house, the single connection an entire deck actually leans on. On flat ground where water settles instead of draining away, the underside of a deck can stay wet for days after a storm has already passed, and that is exactly where the ledger tends to soften first.
Sill plates, rim joists, studs and post bases that have spent years pulling moisture up out of soil that almost never gets a chance to dry. Because the valley floor drains so slowly here, we meet this most often in older North Beaverton crawlspaces, where rainwater pooling against the foundation after a wet week simply has nowhere nearby to go.
Window and door flashing that gave out years ago and has quietly been funneling rain behind the trim ever since. In the narrow side yards typical of newer townhome construction, that hidden cavity barely gets a breath of moving air, so once water slips in behind the casing it can sit for far longer than it would on a more open lot.
Months of slow seepage around a toilet flange or under a shower pan can turn a subfloor spongy with nobody the wiser, since carpet or vinyl hides the give underfoot until the damage is already well established.
A couple of clear photos and one sentence about what you noticed is all we need to get started. Messages that land before 5pm get a real response that same day, and on the rare occasion the issue falls outside what we handle, we will say so directly and point you toward whoever actually should.
On rot work this is the only proof that means anything. A finished photo shows a wall. A pair shows what was behind it.
Drag the handle. Stained studs, loose insulation and an uncapped drain on one side, and a finished glass shower with green tile and brass fittings on the other. Same room, same skylight, one of our jobs.
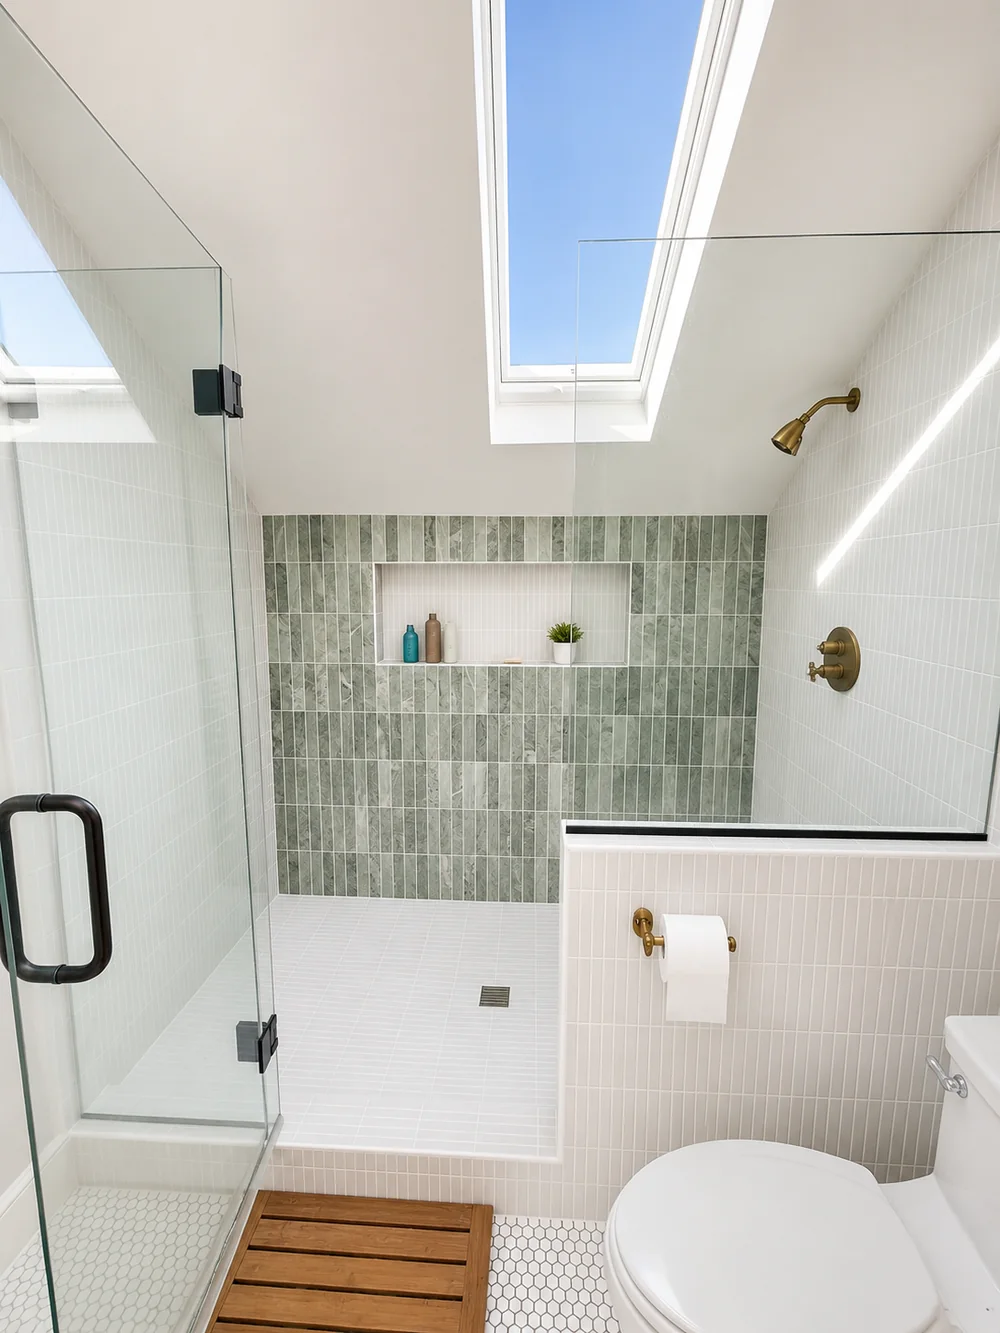
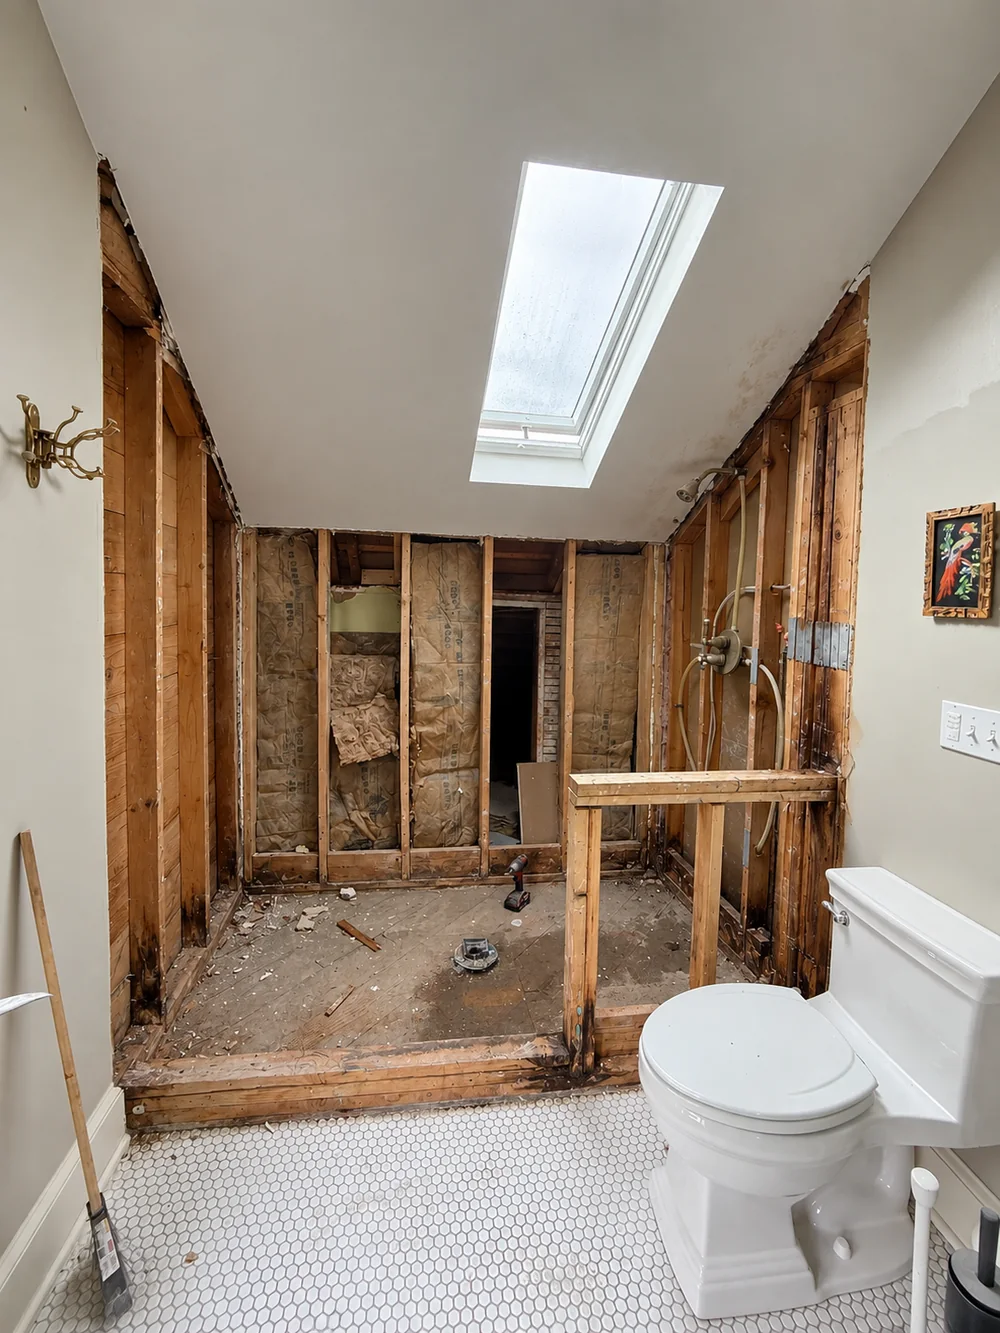 Before After
Whatever shows through the paint is only ever the last stop the water made, not the first. Decay travels through the grain long before it reaches a spot you can press in with a thumb, and on ground this flat, where moisture has nowhere quick to drain, that hidden stretch can run well past anything a stain on the siding would suggest. Price the job off a photograph and you are really pricing a guess, and that guess tends to resurface weeks later as a change order once the wall is actually open.
That is why someone from our crew looks the wall over in person before a number ever reaches paper. We draw a clean line between what can be confirmed standing outside and what only the open framing will reveal, and the estimate is written to match: a firm price for the work we can already stand behind, and a separate, clearly marked allowance for anything else that turns up, one you approve before another cut is made.
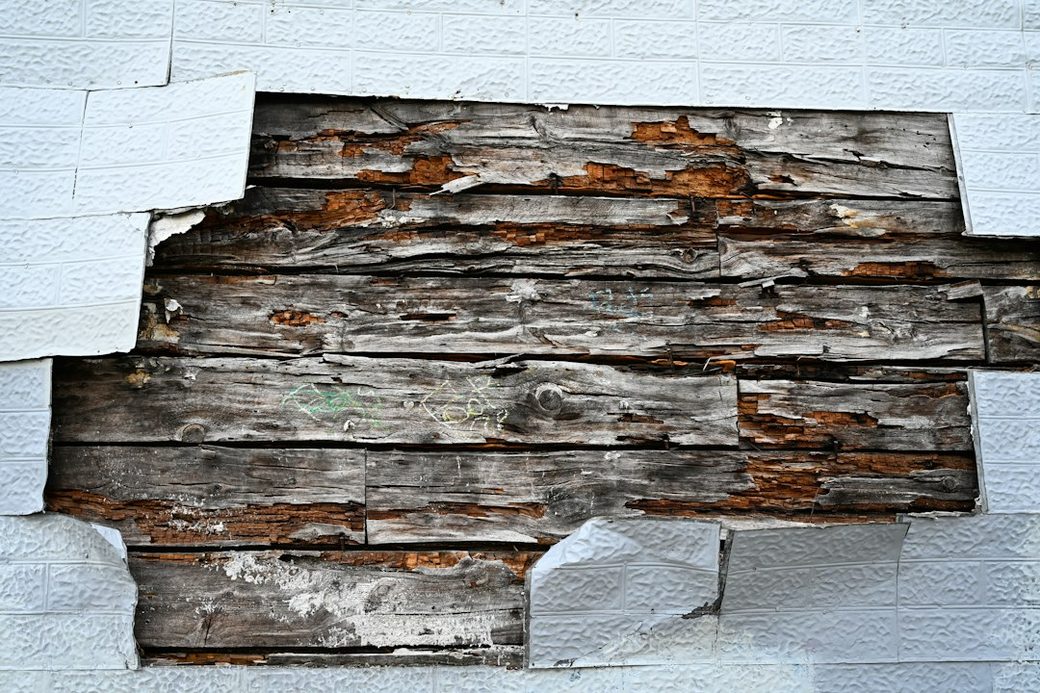
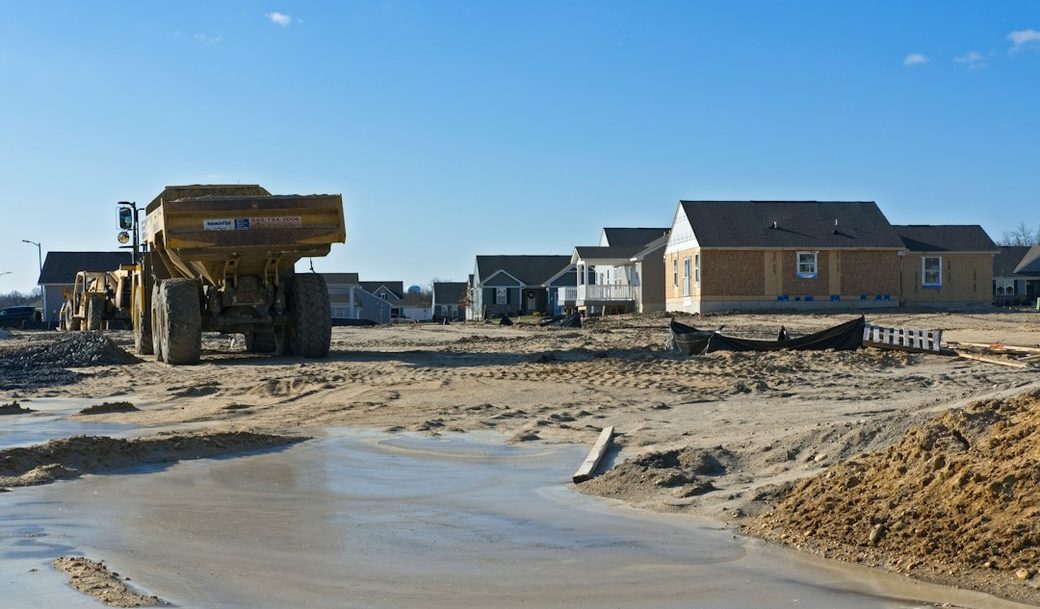
Beaverton’s valley floor lots are flat enough that rainwater doesn’t drain away from a foundation the way it would on a hillside. Water sits closer to the crawlspace and the lower courses of siding for longer, and that lingering moisture is usually where a rot problem starts.
Pulling the bad wood out is the part anyone can watch happen in an afternoon. Choosing what goes back in its place is the part that decides whether we are standing at this same corner again in another ten years.
Matching what the house already wears comes first, because wood that stands out from its neighbors is a repair done wrong, not a repair done well. On an older single-family home in North Beaverton still carrying its original cedar corner boards, cedar goes back, cut to that same profile. Where the exact shape is no longer sold, we build one up from plain stock until the reveal and shadow line settle in with the boards on either side.
What gives cedar and redwood their staying power is the natural oils trapped deep in the heartwood, and the sapwood milled into a board sold today falls well short of the old-growth lumber it stands in for. Primed finger-jointed pine is the budget option and takes a brush beautifully, yet it softens quickly anywhere moisture lingers, and on this slow-draining ground that turns out to be more of the wall than most people expect, so we keep it well clear of the dirt and off the bottom of any trim run. Cellular PVC and fiber cement, by contrast, simply will not rot, which is exactly why they belong at the spots that keep failing: the lower few inches of a corner board, any water table, and window casing that was never fitted with head flashing in the first place. They cost more per linear foot, and they buy you out of a third trip back to that same corner.
Framing follows a simple rule here: anything touching concrete, or sitting within a few inches of grade, goes back pressure-treated without exception, because a damp foundation eating into untreated lumber is precisely what doomed the sill plate the first time around. A sistered joist or a replacement stud is cut from Douglas fir, sized to match what the old member carried and fastened to actually bear that load, not just to fill the gap.
Hardware gets less attention than it deserves, and it should get more. Treated lumber manufactured today carries enough copper to corrode an ordinary galvanized screw within one wet season, so stainless steel and hot-dip galvanized fasteners go into anything touching cedar or treated stock, no exceptions. Skip that detail and the proof shows up fast: rusty streaks bleeding straight down the face of a board, right through whatever coat of paint sits on top.
One last habit decides more than people think: every new piece gets a full coat of primer on every face, cut ends included, before it ever gets fastened into place. Leave that end grain bare and it soaks up moisture like a paper towel dropped in a puddle, which is a bigger predictor of how long this repair actually lasts than any premium label on the paint can.
The real scope of a rot repair rests on four factors, and you can settle the first couple yourself this weekend with nothing more than a screwdriver and a few spare minutes.
The first factor is whether the piece in question actually holds anything up. A length of trim, a water table, or the bottom course of siding carries no load, so a bad run of it costs an afternoon and nothing more. A sill plate, rim joist, post base or deck ledger is a different matter entirely, because the house depends on it, which means temporary shoring, lumber rated to bear weight, and a permit filed through the City of Beaverton’s Building Division using its online Electronic Permitting System, not through Washington County. The lumber itself is rarely what drives the number up. What actually costs money is freeing a load-bearing member safely, bracing the structure above it so nothing shifts while the swap happens.
Second is how far the softness actually extends. Starting at the visibly bad spot, press a screwdriver tip into the wood every few inches as you move outward, and keep going for a full foot past the point where it finally meets resistance again. Decay spreads inside the fiber well before it ever shows on the surface, and cutting back only to where the damage is visible is the single biggest reason a rot repair has to be redone.
Epoxy has a place too, and we will tell you plainly when it applies. A quality consolidant and filler can rescue a detail that is simply not available anymore, a curved porch rail, an original door threshold, a run of molding with a profile no mill still carries, but only where the rot is a contained pocket rather than a full breach through the piece. None of that applies to anything carrying load, and it is not a way to dodge opening a wall. Anyone willing to trowel epoxy into a soft sill plate is quietly booking your second repair before the first one is even finished.
Fourth, and the one that decides whether any of this holds, is what sits above or beside the damage. On ground this flat, water rarely arrives from straight overhead the way it might under a complicated roofline. More often it is a downspout dumping straight at the foundation instead of carrying water away from it, a grade that barely slopes so runoff just sits against the siding, or a deck ledger with no cap flashing at all. We find that source and close it off before any new lumber goes in, priced on the same estimate, because fresh wood set under a leak that is still active only gets paid for twice.
There is no way around it: the final number tracks how much rot is actually there, and that amount stays a mystery until the wall or the deck is physically open. A few things hold true before we ever get that far, though. A contained repair, a run of trim or a handful of soft deck boards, sits near the bottom of any range we quote. Bring a sill plate, a rim joist or a post base into it and the number climbs, because load-bearing work means shoring and a Beaverton Building Division inspection riding along with it. What moves the price more than anything else is simply how many rainy seasons that leak has already had to work, which is why the least expensive repair on flat, slow-draining ground is always the one handled this year rather than put off until next.
Where the dollars actually land tends to surprise people. Lumber is usually the smallest entry on a rot invoice. The real expense sits in labor and reach, setting up staging or working out a safe ladder plan, pulling siding back far enough to get behind the damage, holding a load on temporary posts while the bad piece comes out, and then closing everything back up so nothing shows it was ever touched. A shared-wall repair on a tight townhome lot, where a crew has barely two feet of side yard to stage material in, routinely costs more than the identical repair on a detached ranch house with open ground on all four sides.
Ranked roughly by where the money goes: labor comes first, then the weatherproofing that locks the fix in for good, flashing, house wrap, siding, primer and a finish coat, then the lumber itself, and last, a permit and inspection when the work actually touches structure. Anything that has to be unbolted and rehung along the way, a downspout, a porch light, a stretch of deck rail, shows up as its own line, so you can see exactly which part of the total is wood and which part is just getting to it.
If a competing contractor already gave you a number in writing, hand it over along with your photos. We will typically either come in under that figure by 10% or match it outright, and we will put that promise on paper.
10%
Attach it to an email along with a picture of the damage. Get it to us before 5pm and the answer comes back that same day.
A rot repair happens almost entirely on the outside skin of the house rather than in the rooms you use every day, which makes it one of the least disruptive projects we take on. Here is roughly how the days unfold.
We walk the property with you first, flag exactly which sections are coming off, and settle where the staging, the lumber stack and the dumpster will sit, which on a narrow townhome lot with barely a side yard to work in can take some real planning. Anything breakable close to that wall gets moved clear first, whether that falls to you or to us.
Expect noise and dust through the morning as the old siding and trim come down, piece by piece, until the bare studs are visible by lunchtime. Whatever the framing shows in that stretch is the real answer to the guesswork built into your estimate, not the number we wrote down beforehand.
Should what is behind the wall turn out worse than what we quoted, you get a call that same afternoon, photos attached, before a single additional cut is made. Nothing sitting in the possible extent column moves forward without you saying go ahead first.
Replacement framing goes up, sheathing follows immediately, and the crew stays until flashing and house wrap are both in place, because a bare stud bay left exposed overnight on soil this slow to shed water just invites the leak straight back in. On the occasional day a storm rolls in before we finish, everything gets wrapped and taped watertight until it passes.
The wall gets its siding back, trim comes next, then caulk and a first pass of primer close out the exterior work. At that point the house photographs as finished from the street, and that is typically the moment a passerby stops to ask for a business card.
Final paint goes on last. Once the site is swept and the yard is clear of debris, we walk you through the finished work and check it against the estimate point by point. Every scrap of cut lumber, the old rotted pieces we pulled, and the dumpster itself all leave in the truck with us.
Tap the spot first. Solid wood gives back a sharp knock; wood that has gone soft underneath sounds dull and hollow, almost like knocking on cardboard. Follow that with a fingernail or the edge of a key pressed into the grain. Healthy fiber barely marks. Compromised fiber lets the edge sink in, often releases a faint musty smell, and crumbles away in small damp flakes rather than splintering cleanly. Paint tells its own story too, usually bubbling in small isolated domes right over the softest wood rather than failing evenly across the whole board. Snap a picture of whatever you are looking at and send it along. Anything that lands in our inbox before 5pm gets a real answer that same day.
Sometimes, yes, that genuinely covers the whole problem, and we will say so plainly rather than talk you into more work. The trouble is when the soft wood keeps going past the board you flagged. In that case we are not going to nail a fresh piece over the top and call it finished, because covered rot does not pause just because it is out of sight. It keeps working through the framing behind the patch, quietly, until a bigger and far more expensive repair shows up a year or two down the line.
It happens on a good share of our jobs, so we plan for that possibility up front rather than let it ambush you partway through. The estimate carries two distinct numbers: one locked in for the damage we can already confirm, and a second, clearly flagged allowance for whatever the open wall might still reveal. We do not touch a dollar of that second number until you have looked at our photos and told us to keep going.
That really is a question for your insurance company, since it depends entirely on the wording of your particular policy and on what actually caused the water to get in. We are not in a position to promise coverage either way. What we can offer is a clean paper trail: photographs and written notes on every bit of damage the moment we expose it, so that if you do decide to file, your adjuster is looking at documented evidence instead of your memory of what the wall looked like.
Permit paperwork is on us whenever the job actually requires one. The trigger is weight, not appearance: a foundation sill, a rim joist carrying the floor, the base under a support post, or anything holding up a deck needs a permit pulled, and in Beaverton that goes through the city’s own Building Division and its Electronic Permitting System rather than through Washington County. A wide enough span may have the city asking for engineered drawings with a professional stamp before anyone starts cutting. Our Oregon contractor license, CCB #262707, lets us file that paperwork and book every inspection ourselves, start to finish. A straightforward siding or trim swap with no structural component almost never triggers any of this.
A contained job, a run of trim or a section of siding, usually wraps up in a day, maybe two. Anything structural stretches longer, because the shoring, the inspection, and weatherproofing the opening back in all have to land in order, and finish paint refuses to cure properly in damp air. Your estimate will spell out a day count before we start. You do not need to be home for most of the work, but keep your phone within reach on the day the wall actually opens, since that is when any decision about hidden damage lands in your hands.
Nearly always, yes. Standard lap siding, shingle coursing and the common trim shapes we run into are still stocked at most lumberyards, or a local mill shop can cut a fresh run to match. When a profile really has disappeared from every catalog, we laminate a replica from solid stock and shape it until the reveal lines up seamlessly with what is already on the wall. Paint color is the simpler piece of the puzzle: give us the old can or its code and we are done fast, and without either, a chip pulled straight off the siding gets scanned and matched instead.
Drier months make the job simpler, roughly July through September, mainly because the opening needs to stay exposed for less time before it closes back up. That said, we take rot repairs on in every month of the year, sealing each finished section against the weather as we go rather than leaving the whole thing open until the end of the week. Putting it off until the sky clears almost always backfires, since the leak keeps running the entire time you wait, and on ground this slow to drain, a small soft spot rarely stays small for long.
Evergreen’s shop sits at 505 SE 184th Avenue, over on Vancouver’s east side. Getting a crew to Beaverton means heading south over the Columbia at I-205, then tracking west the length of the Portland metro, a longer drive than most of our calls but still a normal day’s job rather than a special trip. Once here, we take on rot work across North Beaverton’s older single-family blocks and the historic Old Town core, through Cedar Hills near the Nike campus, Five Oaks by its MAX stations, and Raleigh Hills, out to the newer townhome rows filling in Progress Ridge and South Beaverton. Licensed in Oregon, CCB #262707.
Three of the 50 reviews on our Google profile, in the homeowners' own words.
David's work was terrific. Repaired a rotted out structural framing issue in a bathroom and replaced (and resized!) a window in the same space. He initially quoted a two day job but was able to finish in a single day. Dedicated! Will be using him again.
Joe H.Bathroom framing repair
We talked to 4 different contractors and only David, of Evergreen, took the time to climb up to our roof to check out the job. The others gave us bids based upon a photo. Evergreen was not the cheapest but the extent of the work they did was worth every penny.
Steve K.Roof and exterior work
Evergreen crew installed three skylights for us. Once we opened the ceiling there was more to do than expected and they handled it without drama. Clean work, fair price, and they cleaned up after themselves.
Foad M.Three skylights
Send photos and a short description. If it arrives before 5pm you get an answer the same day.
Already have a written estimate from someone else? Send that too. We match or beat most estimates by 10%.
Built for the wet side of the river.

Licensed and insured remodeling contractor serving Vancouver, WA and the Portland metro.
Oregon CCB #262707 · WA Lic. #EVERGRS757MCEvergreen Renewal Services LLC
505 SE 184th Ave Unit 320
Vancouver, WA 98683
© 2026 Evergreen Remodeling. Oregon CCB #262707 · WA Lic. #EVERGRS757MC. Evergreen Renewal Services LLC. All rights reserved.
Same day response on anything sent before 5pm.