

Plenty of Lake Oswego bathrooms still carry their 1920s bones: an original cast-iron tub, a pedestal sink bolted to tile that has never been touched, a toilet set on a flange nobody has looked at in decades. None of that announces trouble on its own. A hairline crack at the tub enclosure or a toilet that rocks half a degree can send water into the framing for years before a single tile moves. We start by chasing that water to wherever it has been going, because on a lakefront or Country Club property, what happens behind the wall carries just as much weight as the finish everyone sees.
Licensed and insured. Oregon CCB #262707
On anything sent before 5pm
We match or beat most written estimates
Remodels completed
Every original surface removed, the wet walls sealed to current standards, and new fixtures set throughout.
Glass and tile wait until the waterproofing behind the pan has been inspected and passed, especially important with humid air rolling in off the lake.
Original framing from the 1920s often needs more than patching once a leak finds it, so it gets rebuilt in solid new lumber.
Floors, walls and showers set over a true bonded waterproofing layer, never tile pressed straight onto bare backer board.
A fan sized for the room clears the extra moisture that lake air carries, before it ever reaches new drywall or trim.
Same room, same window. One side is the bathroom the owners lived with. The other is the one they have now.
Drag the handle. Left, the bathroom as we found it: a tub behind a curtain, a small vanity, shelves on the wall. Right, the same room finished: a glass shower, a soaking tub under the window, a wood vanity on a herringbone floor.
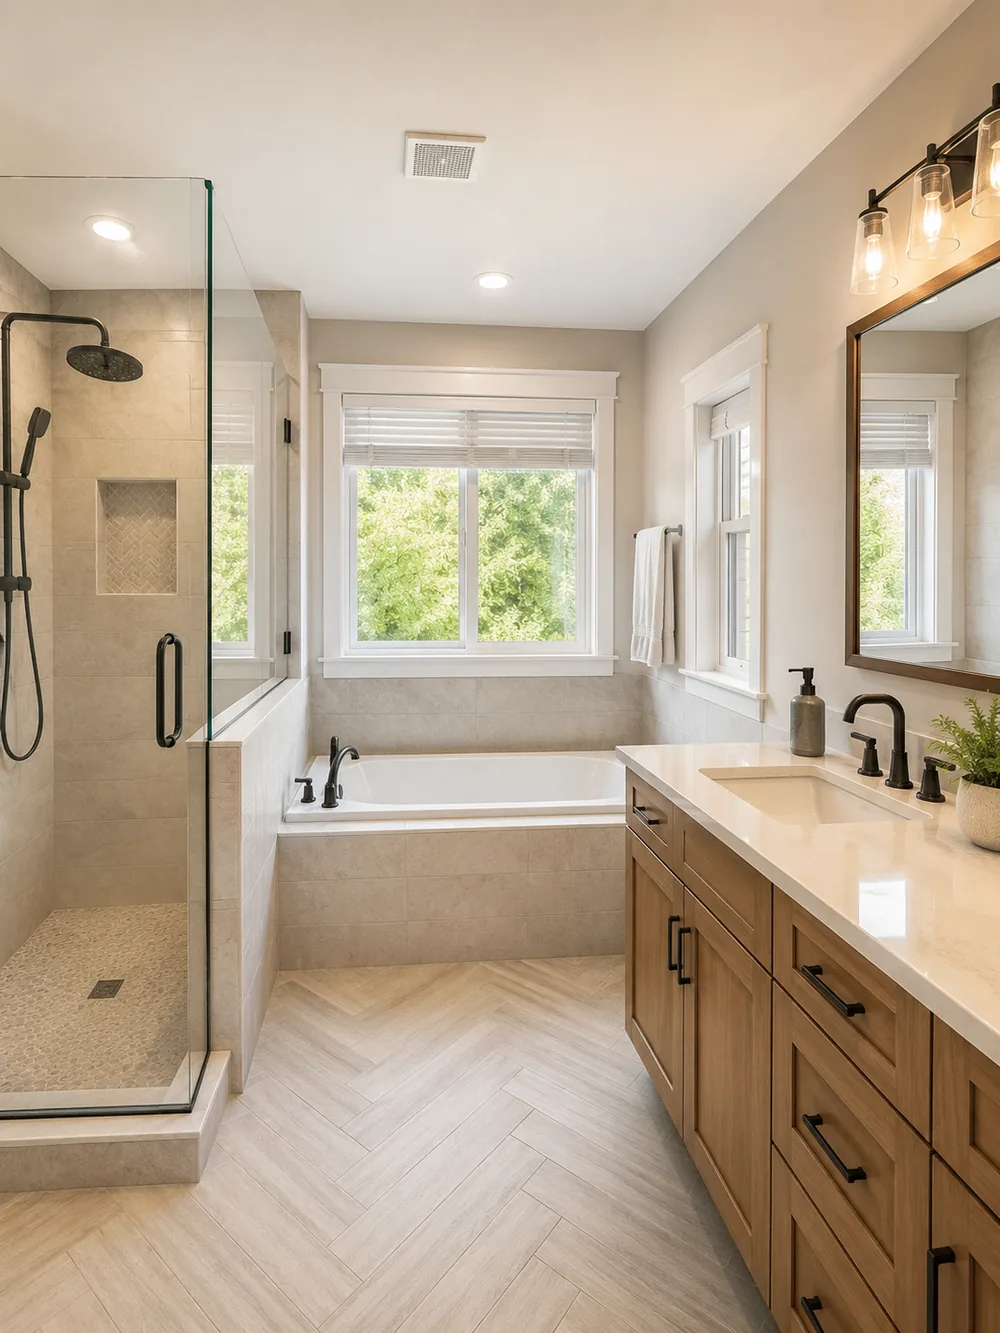
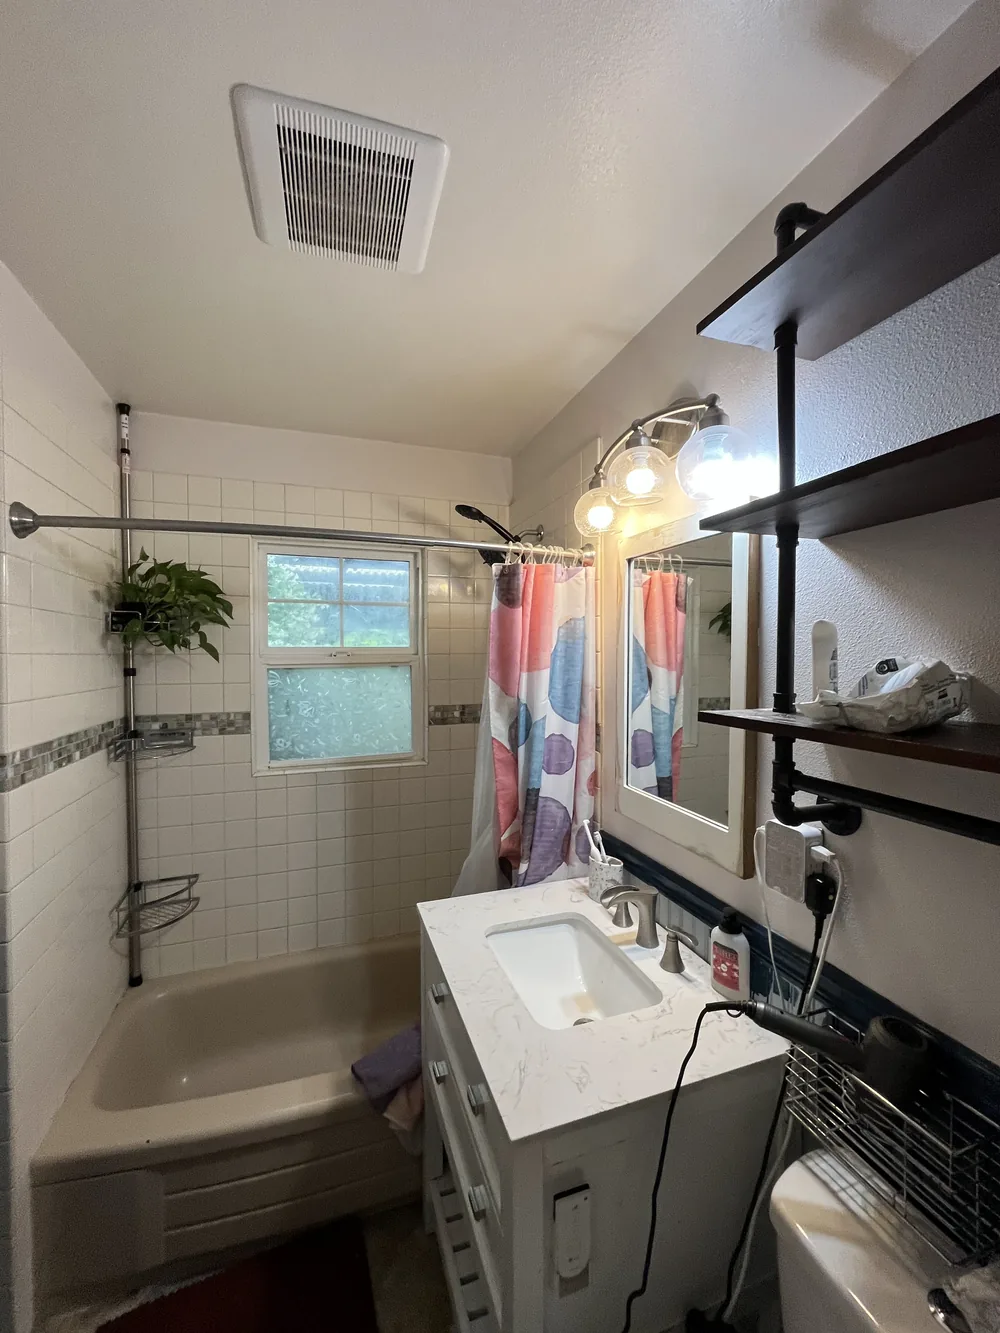 Before After
A Lake Oswego bathroom rarely fails where you can see it. What actually sets its lifespan is buried from view: the membrane bonded behind the tile, the pitch built into the shower pan, corners that hold their seal for decades, and a fan with enough pull to carry wet air completely out of the house. None of that shows up in a listing photo, and a discount remodel skips all four while still looking finished on handoff day. We build every wet area to current waterproofing code and route each fan duct straight outdoors rather than into the attic, because so many bathrooms here sit within a few blocks of Oswego Lake or the Willamette, where the air holds extra moisture on top of the region’s normal rainfall, and a fan that only empties into the attic is simply leaving that dampness nowhere to go but into your original framing.
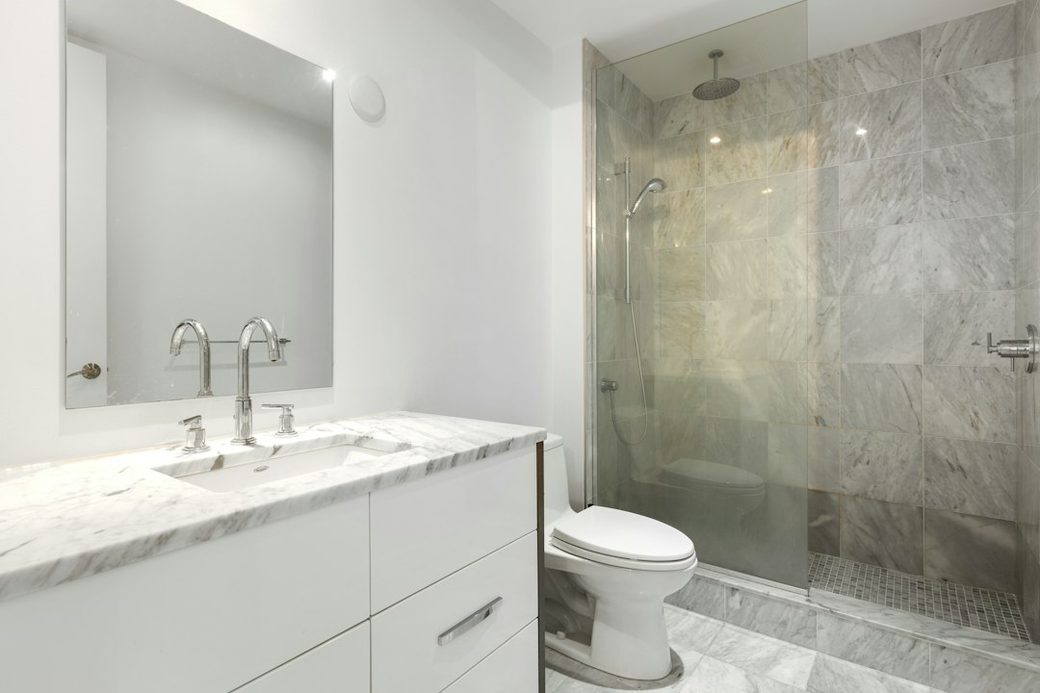
Behind any tiled shower wall sits one of three possible builds, and that choice shapes the room’s future far more than the tile pattern ever will. What we install is a membrane sheet or a liquid-applied coating, run across the backer board and fused into a single unbroken seal at the corners, the seams and every pipe, with tile bedded on top of it. A rigid foam panel reaches a similar result because the panel itself carries the waterproofing. The method we turn down is cement board alone with a bead of mastic at the joints, since that combination tends to let go roughly fifteen years in. Trimming that one buried layer out of a bid is how a bathroom job becomes two jobs instead of one.
Half the waterproofing job actually happens in the floor of the shower. A proper pan slopes evenly to the drain, and the curbless, step-free entry that so many Lake Oswego remodels call for, especially around Country Club and North Shore where a spa look is the goal, needs that slope to begin below the level of the rest of the bathroom. Where a 1920s house still has its original joists in place, getting there means either cutting those joists down through the shower bay or raising the surrounding floor to meet it, a framing question settled long before tile enters the picture. That is why a flush shower adds meaningful cost inside an older First Addition or Lake Grove house, yet barely moves the number in a Palisades remodel where the subfloor is going in new.
Deciding on tile mostly weighs upkeep against appearance. Oversized porcelain slabs mean few grout lines and less scrubbing, though the wall behind them has to be close to perfectly flat and takes longer to set. Switch to a smaller mosaic on the floor and your footing improves when wet, in exchange for considerably more grout to maintain. Stone surfaces, marble among them, carry the higher-end look this market tends to expect, but their porous surface means skipping a resealing routine eventually shows. On grout itself, epoxy belongs wherever water and scrubbing meet, ordinary cement grout works everywhere else, and a flexible caulk line, not grout, goes into every inside corner, since a joint that moves will crack rigid grout eventually.
Put your money into the part that disappears and economize on the part you can always change later. Once tile closes in around it, the mixing valve, thermostatic or otherwise, is sealed inside the wall for good, so that is worth buying well the first time rather than reopening finished tile down the road. The visible trim, lever and showerhead, can be swapped whenever taste changes. Floating a vanity off the wall opens up the tighter floor plans typical of a 1920s Tudor or English Cottage bathroom, though the studs behind it need solid blocking installed before any drywall goes up, a decision made early rather than late. Keep particleboard cabinets well away from any wall a shower can splash, since that material gives out fast in a room this wet.
The exhaust fan closes the list, and it is both the least expensive item on the estimate and the one most responsible for whether the room stays healthy. Size it to the room’s square footage, send its entire duct run outside rather than letting it stop in the attic, wire it to a timer or a moisture sensor, and insulate that duct run so it will not weep condensation back into the fan housing. A great many Lake Oswego bathrooms sit near enough to Oswego Lake or the Willamette that the surrounding air holds extra humidity beyond the region’s usual rainfall, so a bathroom that cannot dry out fully between showers is up against that nearby water as much as the weather itself. That inexpensive fan is what tips the outcome one way or the other.
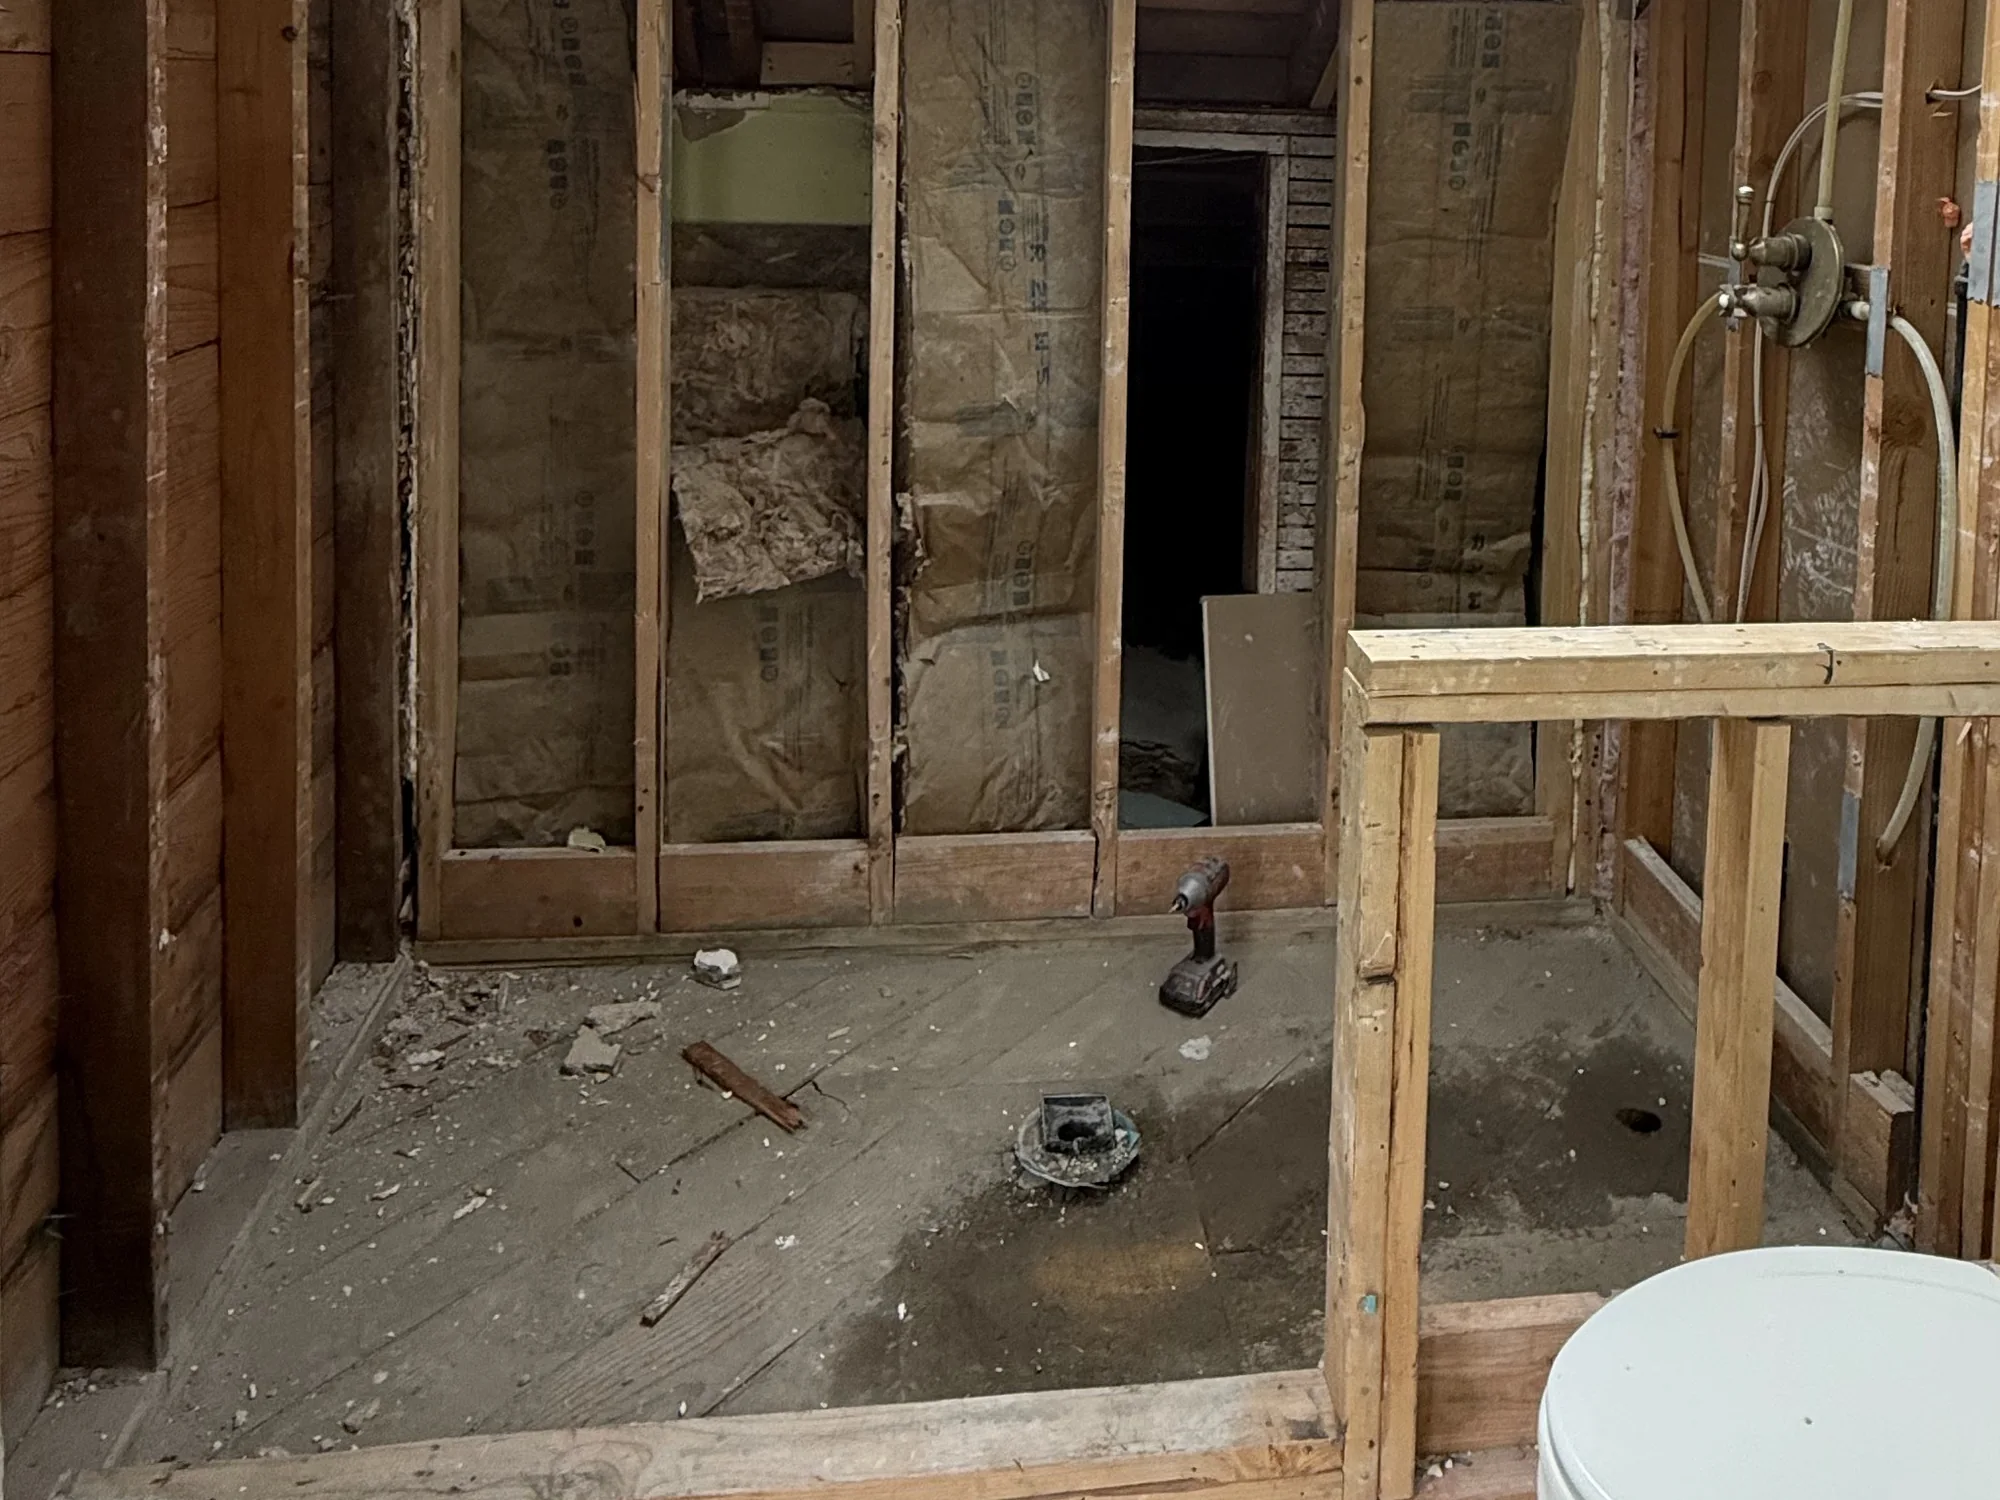
Here is a bathroom paused at the one stage that never makes it into a before-and-after gallery. Every finish has been pulled: tile, tub, vanity and worn flooring, carried out down to the last scrap. What is left standing is a section of old plank sheathing on one wall, loose insulation resting in the stud bays, an open drain left exposed in the subfloor where a toilet once sat, and the toilet itself parked off to the side, waiting its turn since it is always the final fixture reset.
The framing on the right side of the photo is new construction, not a patch job. A wall earns that kind of full rebuild once a shower has been quietly feeding it water. You can see the capped supply stubs and the shower valve already anchored at the exact height it will hold permanently, a decision that cannot wait, since the valve’s position sets out the entire tile layout, and the two of them vanish from view together the instant the backer board goes up.
This open stage is where the final price and the bathroom’s lifespan actually get decided, more than at any other point in the job. While it is all still visible, we settle the calls that matter most: how much fall to build into the pan, whether the shower sits flush with the floor, where the recessed niche gets cut, and whether a tired joist needs a second one fastened beside it. Once that board goes up, every one of those answers is locked in for good, which is exactly why we walk this room with you in person at this point, rather than sending a photograph along after the walls have closed back up.
It turns up often in Lake Oswego, especially beneath a shower inside one of the 1920s Tudor or English Cottage homes that have been running water through the same framing for a century. What is different here is what happens the moment we find it: rebuilding damaged structure is this crew’s own trade, never a scope we hand to a second contractor. Uncover a punky joist or a crumbling run of subfloor and we rebuild it on the spot, at a number already written into your estimate before demo day, so the project keeps moving instead of stalling while someone else gets lined up.
The culprits repeat from house to house. Flex in the floor directly in front of the toilet is the quiet legacy of an original wax seal that gave out years before anyone noticed. The joist under the shower drain turns up dark and soft to the touch. A length of rim joist has been weakened where water has crept into the wall cavity behind an old tub, something we see often in homes close enough to Oswego Lake or the Willamette that the air stays heavier near the water. And framing along an outside wall degrades in any room whose original exhaust fan, if it ever had one, never moved real air. We open the floor wide enough to catch every bit of it while it still lies exposed, because a joist only stays cheap to repair while you can see it.
A handful of factors move the number, roughly in this order: whether the layout shifts (moving a toilet or shower means new drain runs), how much of the room gets tiled, the tier of fixtures you choose, and what turns up once the floor is actually open. A refresh that keeps the existing layout sits near the bottom of the range. A full gut with a new layout and tile running to the ceiling, which is common in a Country Club or lakefront remodel aiming for a higher-end finish, sits at the top. Every estimate is itemized, and if hidden damage shows up, that repair appears as its own line item you approve before any of it happens. Already holding a written quote? We match or beat most estimates by 10%.
Where the money actually lands catches most Lake Oswego homeowners off guard, since a bathroom crowds an unusual number of trades into a small footprint. Labor claims the largest share by a wide margin: tile work is slow and exacting, billed by the square foot, and a room of thirty-five to forty square feet still ends up carrying plumbing, electrical, framing, waterproofing, tile and finish carpentry through in sequence. Tile and waterproofing come next, scaling with the area actually covered rather than the size of the room, which is why running tile to the ceiling in a Palisades or North Shore bathroom costs considerably more than stopping at shoulder height. Fixtures and the vanity follow, entirely a matter of taste and budget. The plumbing rough-in comes last, inexpensive when nothing relocates and costly the moment a toilet or shower does.
The one figure we will not trim is the smallest one on the page: the waterproofing tucked behind the tile. Skip that membrane and you pocket a couple hundred dollars today against a repair running into the thousands a few winters later, so we do not price it that way, and we would rather lose the bid than build a Lake Oswego shower without it.
10%
A couple of photos go a long way, particularly one close-up of anywhere that feels tender underfoot or shows discoloration. Message us ahead of 5pm and expect to hear back within the day.
Square footage this small does not leave much room for a remodel to drag on, which keeps the mess brief and boxed into one part of the house rather than spreading. Below is the sequence the work follows, called out where it matters most if this is the only bathroom in your home.
Before a single tile comes off the wall, the new tile, vanity and fixtures already sit in our shop, ordered and checked against the plan. A finished demo waiting on a late shipment is the one delay in this trade that never needs to happen. We also work out, before that first day, exactly where the dust barrier goes up and which route through the house the crew will use.
Demo typically wraps in a day, occasionally stretching into a second. Tub, tile, vanity and the original flooring all get hauled out, bringing the room down to its bare studs and subfloor so every bit of what the walls concealed is finally visible at once.
At this point everything sits open, so we examine framing, subfloor and the original plumbing lines while we still can. Turn up damage and you will have photographs the same day, with a price attached before another board gets cut.
Once the new plumbing and wiring reach their fixture locations, we fasten solid blocking into the studs wherever a vanity or grab bar will later mount. From there, an inspector with Lake Oswego’s Planning and Building Services Department comes out to sign off on the rough-in before a single piece of drywall goes back up. We do not close in a wall ahead of that approval.
Backer board goes on first, then a continuous bonded membrane sealed into every inside corner, seam and pipe, followed by the pan, and only then does the tile begin to climb the walls and spread across the floor. Nothing about the tile step can be hurried. Thinset needs real days to cure before grout goes in, and grout itself needs more days still before the room can be used, a timeline that runs on its own regardless of anyone’s schedule.
Finish work closes out the project: the vanity and toilet go back in, the mirror and shower glass get hung, the exhaust fan is wired, and paint with trim carpentry rounds the room off. We then walk the finished space with you against the estimate you signed. Most households have the toilet and sink back in daily use days before the shower work is fully finished.
Out of everything in the room, only the shower stays unusable for the full stretch of the job, because it has to be torn out, sealed, tiled and given real time to cure before anyone steps inside it. The toilet and the sink are a different story and typically come back online well ahead of that. Mention at the walkthrough that this is your only bathroom and we will build the schedule around getting those two running again as soon as possible.
Yes, and it is one of the requests we hear most from Lake Oswego homeowners, especially in First Addition and Lake Grove bathrooms where the same tub has sat in place since the house went up in the 1920s. Expect new drain work, a fully waterproofed wet area, and in most cases fresh tile up the walls. Removing the tub also opens the floor it sat on, which is often where years of a slow overflow have left the subfloor soft without anyone realizing it.
Most often in a house this age, a wax ring quietly failed at some point and water has been reaching the subfloor on every flush since, long before any softness became noticeable to a bare foot. It is a straightforward repair once the floor is open, and the price only grows the longer the leak keeps running underneath the original tile. Text us a close photo of the spot and we can usually size up the damage before a single board gets pulled.
Changing where a fixture drains, touching the electrical, or putting rotted framing back together once a wall is open are the three things that trigger a permit. For a project in Lake Oswego, that paperwork goes through the city’s own Planning and Building Services Department at City Hall, never through Clackamas County directly. Because we carry Oregon contractor license CCB #262707, pulling that permit and standing for each inspection falls on us, not you. Leave every fixture exactly where it already sits and skip anything structural, and in the great majority of cases no permit is needed.
In most houses, yes, though the cost depends entirely on how the floor beneath you was framed back in the 1920s. A curbless entry needs its base to start lower than the surrounding floor, so in a home that is already built that means either cutting the joists down across that span or building the rest of the floor up to meet the shower. Which path makes sense depends on what we find, and in a First Addition or Lake Grove home with a reachable crawlspace, we can usually tell from underneath before cutting anything open.
Working out from the studs, it goes backer board first, then a fully bonded waterproof membrane sealed tight at every corner, seam and pipe, and only then thinset and tile. That membrane, not the tile on top of it, is what actually keeps water out of the wall. Backer board left on its own soaks through just like any other board, no matter what a lower bid promises during the walkthrough, and skipping that membrane is the shortcut we find most often once an original 1920s bathroom gets opened up.
Yes, more than almost any other single part of the room. Oswego Lake and the Willamette sit close enough to most of this city that the air already carries more moisture than the region’s rainfall alone would explain, so a fan that moves too little air, or one that simply dumps its load into the attic rather than outdoors, leaves a bathroom wet for hours after anyone has showered. That lingering wet is exactly the condition original framing and the wall behind a vanity rot and mold in. Getting the size right for the room, carrying the duct the whole way to the outdoors, and putting it on a humidity switch or timer adds almost nothing to the budget while the studs are still exposed.
Expect the job to run in weeks, not days, and much of that time has nothing to do with anyone working in your house. Thinset has to harden, grout needs its own days to cure, and the inspector has to be scheduled before the walls can close, all of which eats calendar time without costing you labor hours. A 1920s house tends to add to that window too, since a soft joist or an outdated electrical run discovered mid-demo is common enough that we build room for it into the quote. Every estimate ships with a day-by-day schedule, and if this is your only working bathroom, we plan the sequence so you get the toilet and sink back long before the shower is done.
Lake Oswego sits south of Portland, which makes for a longer haul from our shop on SE 184th Ave in east Vancouver than most of our calls: across the Columbia, the length of the Portland metro, and on until the Willamette comes back into view on the far side of it. Licensed in Oregon under CCB #262707, we take on bathrooms throughout the city, from the 1920s Tudor Revival and English Cottage homes near First Addition and downtown, to the upscale streets of Lake Grove by its village center, the lake-access properties of Palisades, and the Country Club and North Shore addresses that border Oswego Lake itself.
Three of the 50 reviews on our Google profile, in the homeowners' own words.
David's work was terrific. Repaired a rotted out structural framing issue in a bathroom and replaced (and resized!) a window in the same space. He initially quoted a two day job but was able to finish in a single day. Dedicated! Will be using him again.
Joe H.Bathroom framing repair
Evergreen crew installed three skylights for us. Once we opened the ceiling there was more to do than expected and they handled it without drama. Clean work, fair price, and they cleaned up after themselves.
Foad M.Three skylights
David the owner came by for a quote and was able to get us scheduled right away. The communication was great with his team and the guys were on time and very professional. Would highly recommend.
Scott G.Kitchen nook bench
Send photos and a short description. If it arrives before 5pm you get an answer the same day.
Already have a written estimate from someone else? Send that too. We match or beat most estimates by 10%.
Built for the wet side of the river.

Licensed and insured remodeling contractor serving Vancouver, WA and the Portland metro.
Oregon CCB #262707 · WA Lic. #EVERGRS757MCEvergreen Renewal Services LLC
505 SE 184th Ave Unit 320
Vancouver, WA 98683
© 2026 Evergreen Remodeling. Oregon CCB #262707 · WA Lic. #EVERGRS757MC. Evergreen Renewal Services LLC. All rights reserved.
Same day response on anything sent before 5pm.