

A failing bathroom in Cascade Park almost never announces itself where you can see it. A toilet set on a wax ring that gave out quietly, or a shower pan that has started seeping at one seam, can feed water into the subfloor under a 1960s or 1970s ranch for years before a single tile shifts. Most of the homes on these quiet cul-de-sac blocks went up under county subdivision rules, long before Vancouver annexed this part of town in 1997, so nobody has ever had to answer for what is actually behind that tile. We open the wall expecting exactly that uncertainty, and putting the rotted framing back together once we find it is the job this crew is built around, not work we pass along to someone else.
Licensed and insured. WA Lic. #EVERGRS757MC
On anything sent before 5pm
We match or beat most written estimates
Remodels completed
Old surfaces stripped away, a sealed membrane carried behind every wet wall, and brand-new fixtures set throughout.
Once the tub is out, the shower pan and waterproofing get checked before glass or tile cover any of it.
Decades of a hidden leak can rot framing down to the studs, all of it removed and rebuilt with solid new lumber.
Nothing gets tiled until every wet wall and floor carries its own sealed waterproof layer, never backer board standing in as the only barrier.
Fixtures go in level, the vanity is positioned so the door swings freely, and the fan is sized to actually clear steam, not just meet code.
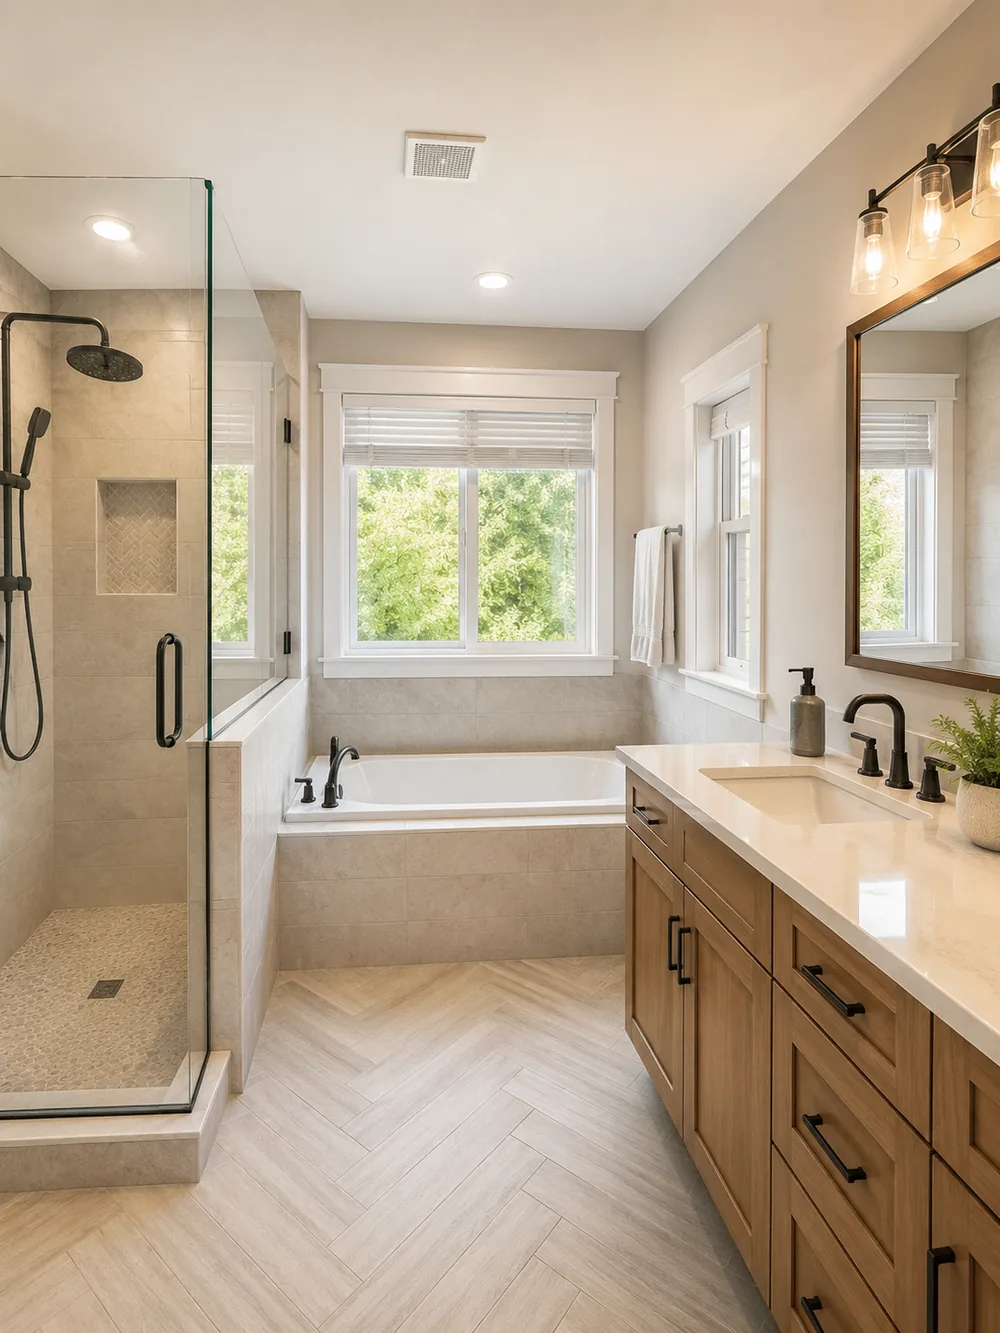
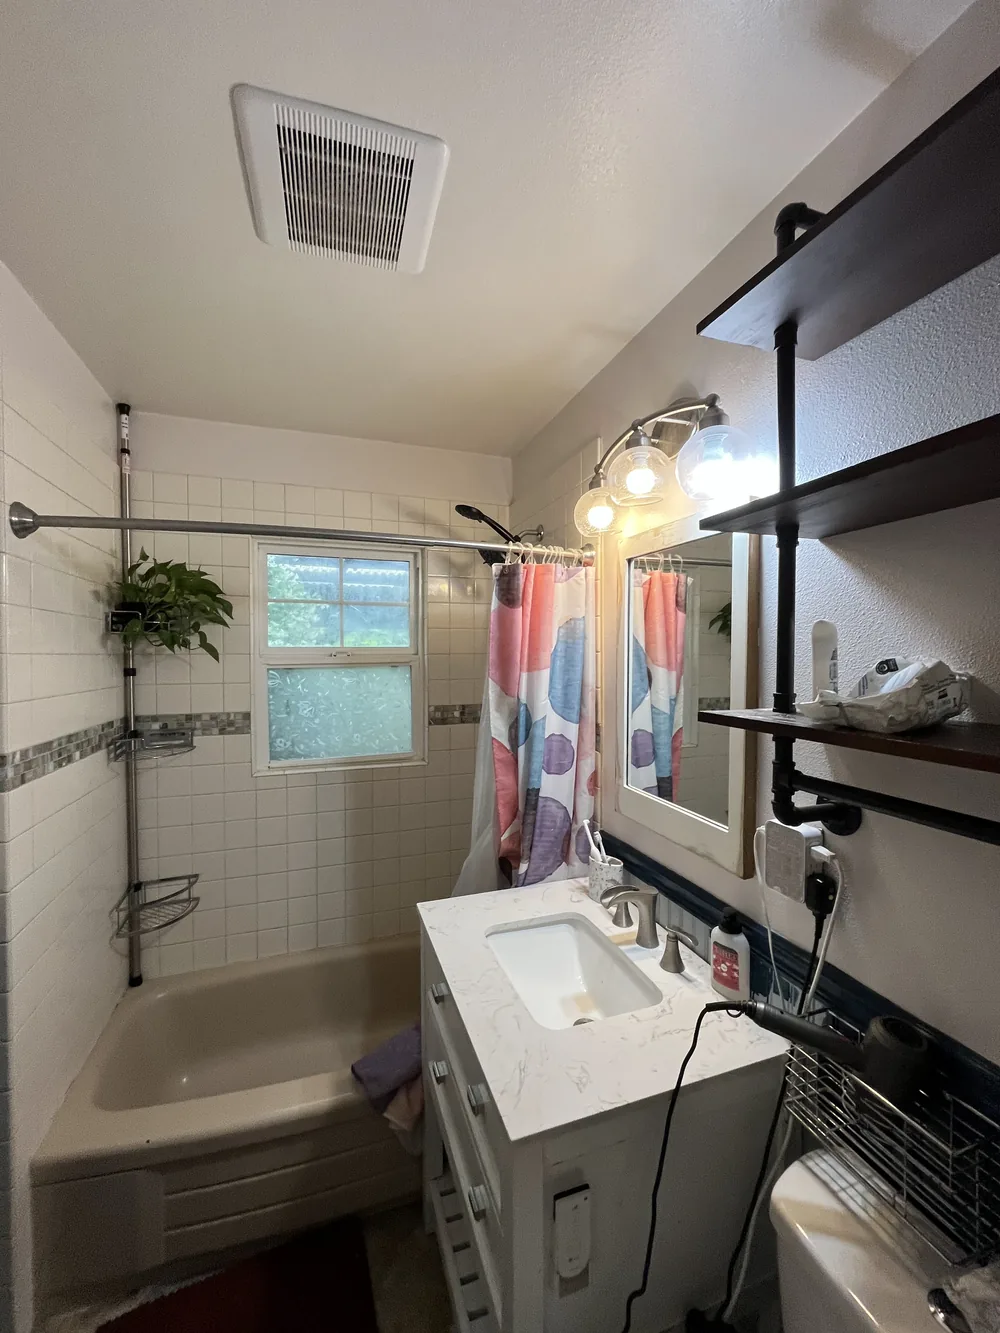
Same room, same window. One side is the bathroom the owners lived with. The other is the one they have now.
Drag the handle. Left, the bathroom as we found it: a tub behind a curtain, a small vanity, shelves on the wall. Right, the same room finished: a glass shower, a soaking tub under the window, a wood vanity on a herringbone floor.
 Before After
A Cascade Park bathroom rarely goes bad at the surface you wipe down every week. It goes bad behind that surface, in the pieces nobody ever photographs: a waterproof membrane bonded tight to the wall, a shower base built to carry water to the drain instead of letting it sit, corners and seams that hold their seal for years, and a fan genuinely strong enough to clear wet air out of the house rather than just stirring it around. A bargain remodel can skip every one of those four and still pass for finished on the day it wraps. We build every wet area to current code and run each fan’s duct all the way outside, through a sidewall or the roof, because this stretch of east Vancouver still sees something like 41 to 43 inches of rain most years, and a fan that only empties into the attic is nothing more than a framing repair you have not scheduled yet.
Three different builds can sit behind a shower’s tile, and the one your contractor chose outlasts any tile pattern you pick. The system this crew installs is a bonded membrane, either a sheet product or a liquid coating, carried over backer board and tied into a single unbroken seal at every corner, seam and pipe penetration before a single tile goes down. A rigid foam panel reaches a similar result because the waterproofing is built into the panel itself rather than applied afterward. The outdated approach, plain backer board with mastic smeared at the joints, tends to let go roughly a decade and a half into the room’s life, and it is not something this shop will put behind a wall. Trim that one hidden layer off a bid and the only thing standing between your subfloor and the shower above it disappears with it.
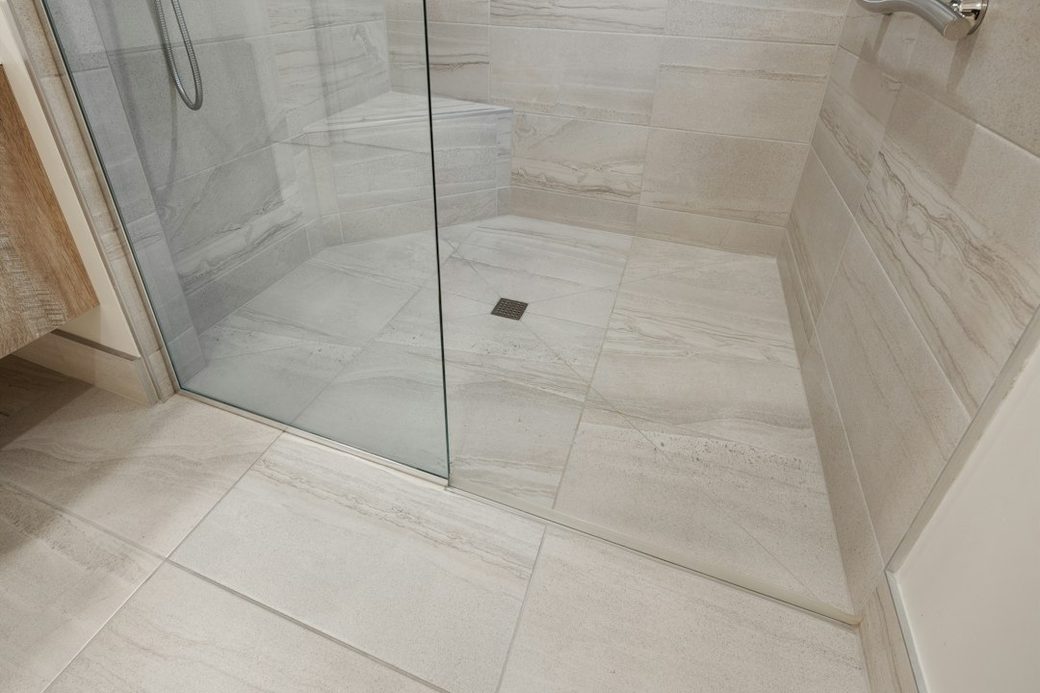
Half of that waterproofing job actually happens in the floor of the shower, not the wall. A proper pan has to pitch evenly toward the drain, and the step-free entry most homeowners request now needs that pitch to begin below the level of the surrounding floor. In one of these original ranch homes, where the joists were already set long before the city of Vancouver had any say over what got built on this cul-de-sac, reaching that low point usually means cutting the existing joists down across the shower’s width or framing a short section lower to begin with, and that call gets settled before anyone mixes a bag of thinset. That is exactly why a flush shower adds real cost inside a house framed under the old county rules, and barely moves the number in a condo or newer build where the subfloor is still open.
Which tile you choose mostly comes down to how much upkeep you are willing to sign up for later. Oversized porcelain slabs leave you with almost no grout to scrub, though the wall behind them has to be close to perfectly flat and costs more in labor to hang correctly. Drop to a mosaic or pebble floor and your footing improves once the floor is wet, at the cost of far more seams to maintain over time. Natural stone reads as upscale and drinks water readily, so a stone shower commits you to a resealing habit you cannot let slide for long. For grout, we run epoxy anywhere a brush and water meet routinely, ordinary cement grout everywhere else, and a flexible sealant rather than grout at every inside corner, since a joint that moves will crack anything rigid eventually.
The exhaust fan is the smallest number on the whole estimate, and it carries more weight for the room’s long-term health than anything above it on the page. Match the fan to the square footage of the room, carry its duct the entire way to open air instead of letting it dead-end in the attic, wire it to a timer or a humidity sensor, and insulate the run so condensation does not drip back down into the housing. With this part of Vancouver pulling in somewhere around 41 to 43 inches of rain most years, a bathroom that never gets a real chance to dry out between showers rots on a predictable schedule no matter how new or old the house around it happens to be. That one inexpensive part is what decides which way it goes.
Spend selectively on the fittings themselves: buy the valve well and let your taste guide everything downstream of it. The mixing valve, whether it balances pressure or runs off a thermostat, disappears into the wall the moment tile closes in around it, so that is the one piece worth getting right the first time rather than reopening finished work later. The handle and showerhead bolted to its face, by contrast, swap out on any ordinary weekend years down the line. Floating a vanity off the floor can make a tighter Cascade Park bathroom feel noticeably larger, but the studs need solid blocking fastened in before the drywall closes, a decision made at rough-in or not at all. One more caution: composite cabinet stock set beside a shower in a room this consistently damp tends to swell and come apart within just a handful of years.
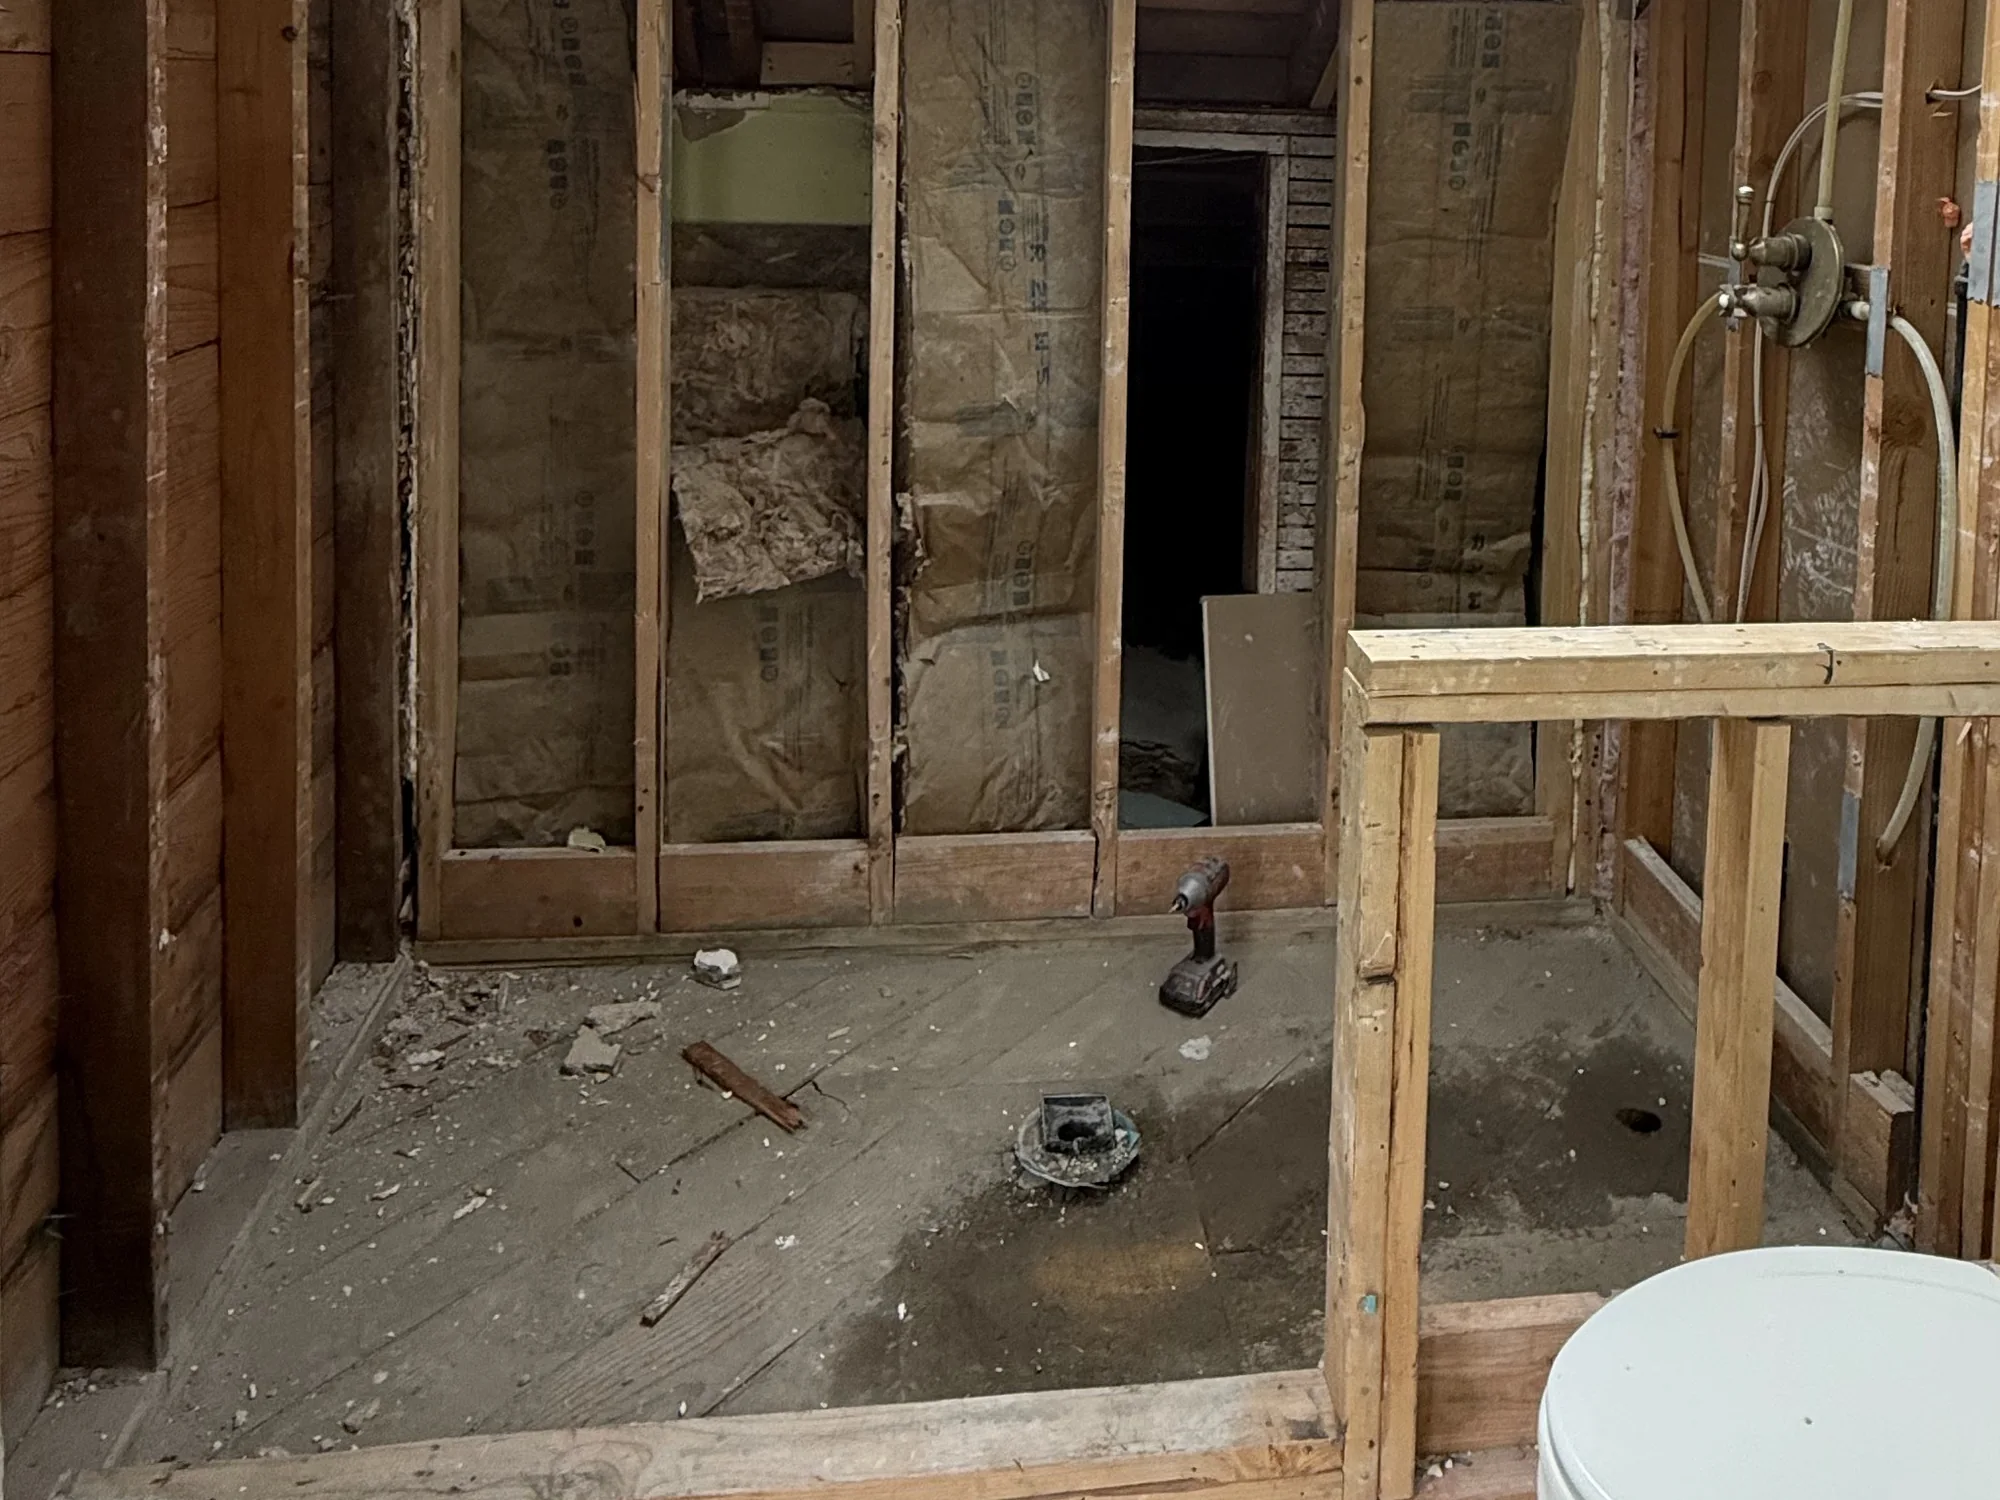
This is an actual project of ours, caught at the one stage a camera almost never visits: every finish already hauled out. Tile, tub, vanity and the tired flooring are gone, leaving a wall of the original plank sheathing, insulation sagging loose between the studs, an open drain pipe standing alone where the toilet used to bolt down, and the toilet itself parked to one side, waiting since it always goes back in last.
The wall you see rebuilt on the right is not a patch. It is all new lumber, which is what a wall earns once a shower has been feeding it water for years. The supply lines sit capped for now, and the shower valve is already fixed at the exact height it will hold for good, a call that cannot wait, because the valve decides where every piece of tile lands, and both vanish from view the moment the backer board goes up.
No other stretch of the job carries this much weight for the final price or the room’s lifespan. With everything still open, we settle what actually matters: how much the pan should pitch, whether the entry sits flush with the hallway floor, where a recessed niche belongs, whether a softened joist needs a second one bolted beside it. Once that board goes on, every one of those calls is permanent, which is exactly why we want you standing in this room with us at this point, not reading about it later in an email with a photo attached.
We run into this routinely in Cascade Park, especially beneath a shower that has run daily for twenty, thirty, even forty-plus years inside one of the original ranch or split-level homes built here before the city ever had a permit office to answer to. What matters is the step that follows the discovery: putting rotted framing back together is work this crew does itself, never a scope we hand off to a second company. Find a punky joist or a crumbling patch of subfloor and we rebuild it right then, at a number already written into the estimate you approved, so the job keeps moving instead of stalling while somebody tracks down another trade.
A short list of trouble spots repeats from house to house. Some give in the floor right where the toilet sits is almost always the legacy of a wax ring that failed quietly years back. The joist directly beneath the shower drain tends to go dark and soft enough to dent with a thumb. A run of rim joist turns punky where an overflowing tub has wicked into the wall cavity for years. And framing along an exterior wall deteriorates in any room whose original fan, if the house ever had a decent one, never actually cleared the air. We open the floor wide enough to catch every bit of that while it still lies exposed, because a joist only stays cheap to fix while you can see it.
A handful of things move the final number for a Cascade Park bathroom, and they tend to rank in this order. Top of the list is whether anything relocates, since sending a toilet or shower to a different wall means fresh drain runs underneath, and inside the city limits that kind of change is exactly what pulls in a permit from the city’s Community Development Department. After that comes the square footage of tile going up, the tier of fixtures you land on, and whatever the subfloor turns out to be hiding once it is actually open. Keep the layout as it already sits and simply refresh the surfaces, and the number lands near the bottom of what we quote. Rework the layout and carry tile to the ceiling, and it climbs toward the top. Every estimate we send is broken into line items, and any damage the floor hides becomes its own approved line before we touch it. Already holding a written number from someone else? Pass it along. We match or beat most estimates by 10%.
Where that money actually lands tends to surprise people, since a bathroom crowds a startling number of trades into a very small footprint. Labor claims the largest share by a wide margin: setting tile is slow, exacting work billed by the square foot, and a room of thirty-five to forty square feet still has to host plumbing, wiring, framing, the waterproof membrane, the tile itself, paint and trim carpentry, each trade taking its turn. Behind labor sit the tile and membrane materials, priced by how much surface you cover rather than by the room’s size, which is exactly why tile running to the ceiling costs well beyond stopping it at shoulder height. The vanity and fixtures come next, entirely a matter of what you choose to spend. Last on the list, and usually the cheapest, is the plumbing rough-in, inexpensive while nothing moves and costly the moment a toilet or shower does.
One number on that estimate never gets trimmed, and it happens to be one of the smallest figures on the whole page: the waterproof membrane tucked behind the tile. Leaving it out would hand you back a couple hundred dollars today against a repair running into the thousands a few winters later, so we will not price a Cascade Park bathroom that way. We would rather lose the bid than build a shower we already know is going to fail.
10%
A close photo of the trouble spot is the quickest way to get a real read rather than a guess, and it helps to mention roughly when your section of Cascade Park was built. Reach us ahead of 5pm and expect an answer back that same afternoon.
A bathroom is such a small footprint that the disruption stays boxed into one room and a short calendar instead of spreading through the rest of a Cascade Park house for weeks. Below is the order the work actually runs in, flagged where it matters most if this happens to be the only bathroom you have.
Nothing here starts with a sledgehammer. The tile, the vanity and every fixture you have picked are special-ordered and confirmed physically in hand before a single wall comes apart, since a half-finished bathroom waiting on a late tile shipment is the most avoidable delay in this entire trade. Before day one we also walk the house to settle where the dust barrier goes up and which door or hallway the crew will use every day to reach the room.
Figure on a single working day for most Cascade Park bathrooms, stretching to two only when the footprint runs unusually large. Crews pull the vanity, tub or shower surround, tile and worn flooring out as one continuous push, so by the time the day ends, the room has gone from finished to open studs and bare subfloor, and whatever the old walls were hiding is finally out where we can see it.
This is the real inspection, not a formality we skip past. With the framing, the subfloor and whatever plumbing was already running through the wall finally out in the open, we go over all of it closely. Turn up anything damaged and you get a photo of it within the hour, plus a number attached before we pick up another tool.
New plumbing and wiring reach their fixture locations, solid blocking goes into the studs ahead of time for the vanity and any grab bars, and then the rough-in gets inspected. Because Cascade Park has sat inside Vancouver’s city limits since the 1997 annexation, that inspection runs through the City of Vancouver’s own Community Development Department rather than Clark County, filed through the city’s permits page and signed off by an inspector sent out from 415 West 6th Street. We hold a Washington contractor registration, WA Lic. #EVERGRS757MC, so scheduling that inspection and standing for it is on us. Nothing gets closed up until it passes.
Backer board goes up first. Over it we bond a continuous waterproof membrane, worked into a tight seal at every corner, seam and pipe, and only then does the shower pan go in, followed by tile climbing the walls and spreading out across the floor. Setting tile itself is the one stretch of this job that nobody can rush, since thinset and grout cure on a timetable that belongs to the materials, not to any schedule we would hand them.
Finish day brings the room back together in reverse order of how it came apart: toilet and vanity bolted down, the bathroom mirror and shower enclosure installed, the fan connected and tested for draw, walls given their final coat, and trim carpentry nailed home. Before we call anything finished, you and the crew go through the space together, checking it against the plan you originally signed. Because the shower needs its tile to finish curing, most Cascade Park households have a working sink and toilet well ahead of that, often close to a week sooner.
Expect the shower to be the holdout. It has to come apart, get a fresh waterproof membrane, take new tile, and then sit untouched while everything cures, so it stays off limits the longest of anything in the room. The toilet and sink have a much shorter wait and are usually back in daily rotation well before that. Just let us know at the start, whether the house is one of the original ranches or a newer condo unit, that yours is the single working bathroom, and we will shape the day-by-day order around getting water running to those two fixtures first.
Yes, and it is one of the most requested changes we build in this neighborhood, especially in the ranch and split-level homes that have carried the same tub since the original build-out. Expect the drain to move, the entire wet area to get properly waterproofed, and in most cases new tile climbing the walls. Pulling the tub also opens up the floor it has been sitting on, which is frequently where we find a soft patch of subfloor that a slow, unnoticed overflow has been feeding for decades.
Flex right at the base of the toilet almost always traces back to a wax ring that failed quietly at some point, after which every flush has sent a little water into the subfloor below. It’s a routine repair once the floor is open, and it costs considerably less handled now than after another one of this area’s wet winters has a few more months to work on it. Send us a close photo of the spot and roughly how old the house is, and we can usually judge how far it has spread before we ever pull a board.
Yes, whenever the work relocates plumbing, opens up wiring, or rebuilds structural framing under the floor. Because Cascade Park has been inside Vancouver’s city limits since the 1997 annexation, that permit is filed with the City of Vancouver’s own Community Development Department rather than Clark County, through the city’s permits page, with City Hall at 415 West 6th Street. We carry a Washington contractor registration, WA Lic. #EVERGRS757MC, so pulling that permit and standing for every inspection it calls for is on us, not you. Replace fixtures in the same spots with nothing structural touched, and in most cases no permit is required at all.
It depends on which kind of Cascade Park bathroom you are starting with. A condo unit sitting on a concrete slab is usually a non-starter for true zero-threshold entry, since there is no joist bay to drop and cutting into a slab changes the scope considerably. A detached ranch or split-level from the late 1970s or 1980s is a different story: most of those have a standard joist floor we can work with, lowering the section under the shower or building up the surrounding floor to match, whichever the framing allows. Pull a small access panel or peek in from a crawlspace first, and we can usually tell you which route your particular house needs before any demo starts.
Grout and tile keep water from pooling on the surface, but the thing actually keeping your wall dry sits underneath both of them. Before any tile goes on, we bond a sheet or liquid membrane across the backer board and tie it into every corner, seam and pipe opening so there is not a gap anywhere. Skip that step and lean on backer board by itself, and the wall will eventually take on water the same way any gypsum product does, only on a longer timeline. We run into that missing layer more than any other defect when we open up an older Cascade Park bathroom that has never had real work done to it.
Yes, more than almost anything else in the room. This part of Vancouver sees somewhere around 41 to 43 inches of rain most years, and a fan that is undersized, or one whose duct simply dead-ends in the attic instead of reaching outside, leaves a bathroom damp for hours after the water shuts off. That lingering moisture is exactly what rots framing and grows mold behind a vanity, something we see often in homes built here before the city had any permitting say over how the original work was done. Sizing the fan to the room, running its duct fully outdoors, and wiring it to a timer or humidity sensor costs very little while the studs are still open.
Plan on weeks rather than days for a full gut and rebuild, and know that a good share of that stretch is thinset and grout curing and the wait for the City of Vancouver’s inspector to come out, not a crew standing idle in the room. Reworking the layout or rebuilding framing a hidden leak has rotted pushes the finish date out further still. Every estimate we send carries a real day count, and if the house has just the one bathroom, we sequence the work so the toilet and sink come back early in the run.
Our shop sits on SE 184th Ave in east Vancouver, close enough to Cascade Park that most calls here barely register as a drive, no bridge and no county line between us. We remodel bathrooms across both halves of the neighborhood, the established ranch and split-level streets of Cascade Park East and Cascade Park West, the condo buildings with their own HOAs scattered through the area, and the newer infill filling in gaps left from the original build-out. Just over on 164th Avenue and Mill Plain Boulevard sits the commercial core of Fisher’s Landing, and we work plenty of bathrooms in the houses around it too, along with the streets near the Firstenburg Community Center on NE 136th and on toward I-205.
Three of the 50 reviews on our Google profile, in the homeowners' own words.
David's work was terrific. Repaired a rotted out structural framing issue in a bathroom and replaced (and resized!) a window in the same space. He initially quoted a two day job but was able to finish in a single day. Dedicated! Will be using him again.
Joe H.Bathroom framing repair
Evergreen crew installed three skylights for us. Once we opened the ceiling there was more to do than expected and they handled it without drama. Clean work, fair price, and they cleaned up after themselves.
Foad M.Three skylights
David the owner came by for a quote and was able to get us scheduled right away. The communication was great with his team and the guys were on time and very professional. Would highly recommend.
Scott G.Kitchen nook bench
Send photos and a short description. If it arrives before 5pm you get an answer the same day.
Already have a written estimate from someone else? Send that too. We match or beat most estimates by 10%.
Built for the wet side of the river.

Licensed and insured remodeling contractor serving Vancouver, WA and the Portland metro.
Oregon CCB #262707 · WA Lic. #EVERGRS757MCEvergreen Renewal Services LLC
505 SE 184th Ave Unit 320
Vancouver, WA 98683
© 2026 Evergreen Remodeling. Oregon CCB #262707 · WA Lic. #EVERGRS757MC. Evergreen Renewal Services LLC. All rights reserved.
Same day response on anything sent before 5pm.