

What a newer house eventually needs
Rot is a water problem long before it is a carpentry one, and in Fishers Landing the water has a specific kind of house to work on. Something like 41 to 43 inches of rain falls here most years, and most of what is actually built in this part of Vancouver went up in the 1990s and 2000s: single-family homes, townhomes and apartments laid out in small, purpose-planned communities with attached garages and sidewalks, not scattered custom lots. The first generation of builder-applied sealant, flashing and trim on those houses is now reaching the twenty- to thirty-year mark, right where failure typically starts to show. A detached house from decades earlier does not have what a townhome does: a shared wall, a garage tucked against the living space, and a flashing detail where those two rooflines meet that either got built right the first time or has been quietly leaking for years. Tracing the water back to where it actually got in, cutting past the last soft fiber, and rebuilding whatever carries load before any siding goes back on is most of what we do here, whichever of those building types you own.
Licensed and insured. WA Lic. #EVERGRS757MC
On anything sent before 5pm
We match or beat most written estimates
Remodels completed
A Fishers Landing winter puts close to forty inches of rain onto houses built with sealant and flashing that is only now hitting its twenty- to thirty-year mark, and that is enough time for water to work into most of the exterior joints a newer house has. On the townhomes, attached-garage single-family homes and apartments common out here, these are the spots it reaches first, and the ones we end up opening most:
The first pieces to give out on a Fishers Landing townhome or single-family home: corner boards softening near grade, the casing wrapped around each window and door, water tables and belly bands, and the sheathing sitting behind all of it. On construction from the 1990s and 2000s, that trim is often an engineered or composite product rather than solid cedar, and it tends to fail at a seam or a fastener line instead of along the grain the way older wood does.
Soft decking, the joists and beams underneath it, and the ledger that bolts the whole deck into the house are what we find most. On a townhome or attached-garage home built here in the 1990s or 2000s, that deck is usually original to the house rather than a later add-on, flashed to whatever standard was common at the time, which is not always what we would flash to today. The ledger is still the first piece to give out.
Rim joists, sill plates, studs and post bases that have spent twenty to thirty years pulling moisture up out of the ground, the same age range as the builder sealant and flashing failing above them. We find it most in the crawlspaces under the attached-garage homes and townhomes built here through the 1990s and 2000s, where tighter lot spacing leaves less open ground around a foundation than an older, larger lot would have.
Flashing above a window or door that was installed to the standards of the 1990s or 2000s, now twenty to thirty years into carrying water, has had plenty of time to start steering rain in behind the trim instead of off of it. On a townhome, the seam where a shared wall meets the roofline, or where a garage roof ties into the main structure, is its own weak point, one a detached, single-era ranch never had to deal with at all.
A supply line or shower pan that has been seeping quietly for months inside a bathroom that is otherwise only twenty to thirty years old can soften the subfloor long before a tile cracks or anyone notices the floor give underfoot. Age does not protect a house here. A fixture installed to a builder’s original spec fails the same way an older one does once the seal finally lets go.
A photo or two, along with a sentence on what’s got you wondering, is all we need to start. Get it to us before 5pm from anywhere in Fishers Landing or east Vancouver generally, and you’ll have a real answer the same day. On the rare occasion this isn’t actually rot, you’ll hear that from us too, plainly, instead of us taking on a job that isn’t ours to take.
On rot work this is the only proof that means anything. A finished photo shows a wall. A pair shows what was behind it.
Drag the handle. The two halves of this slider show one rot job of ours: the shower opened and the wet framing exposed, then the same space rebuilt and tiled into a walk-in shower.
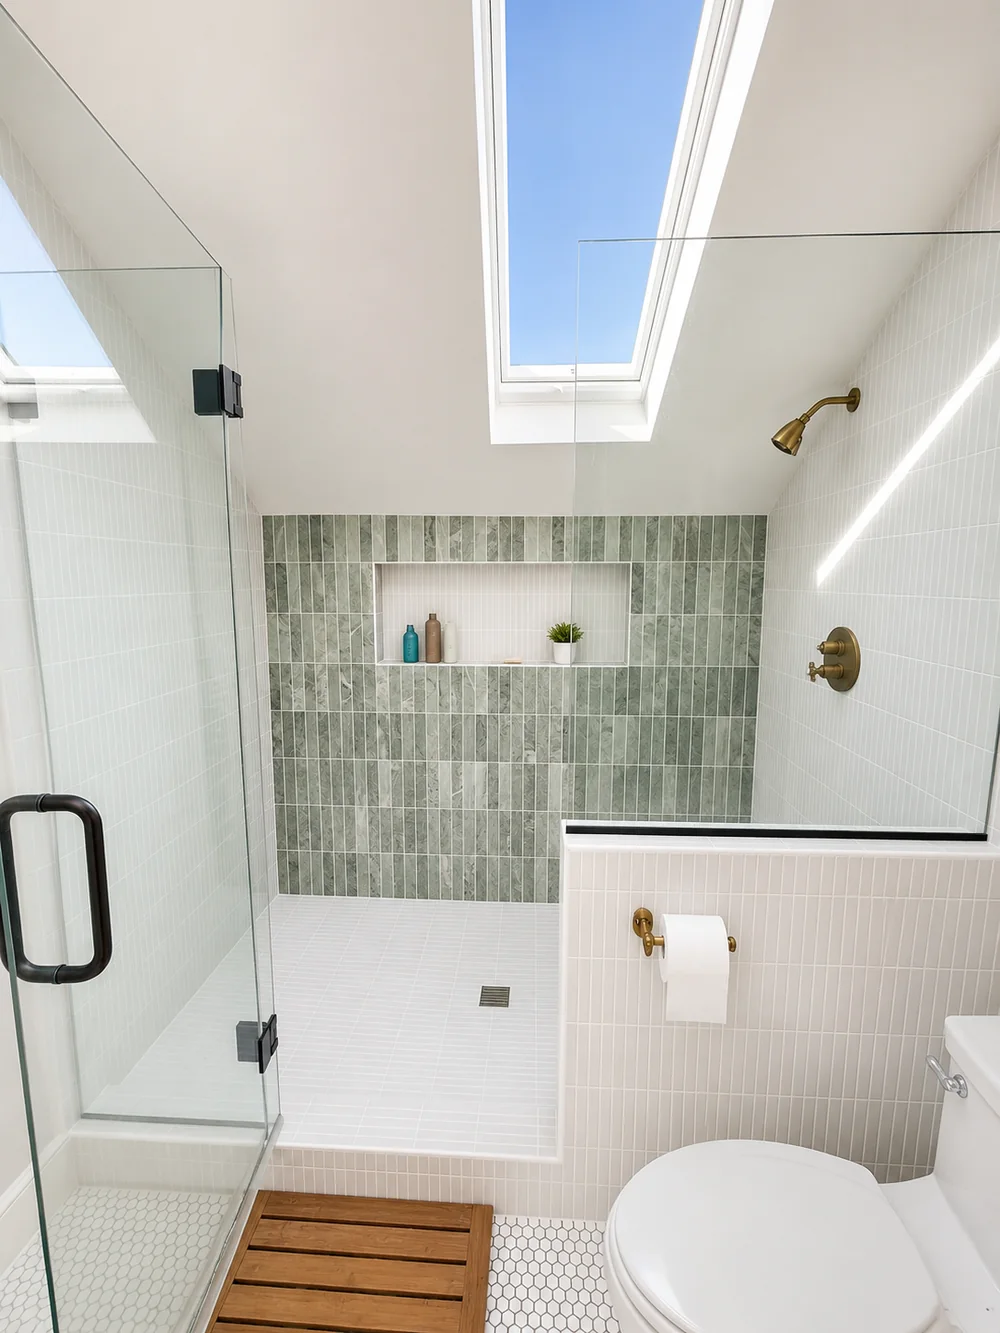
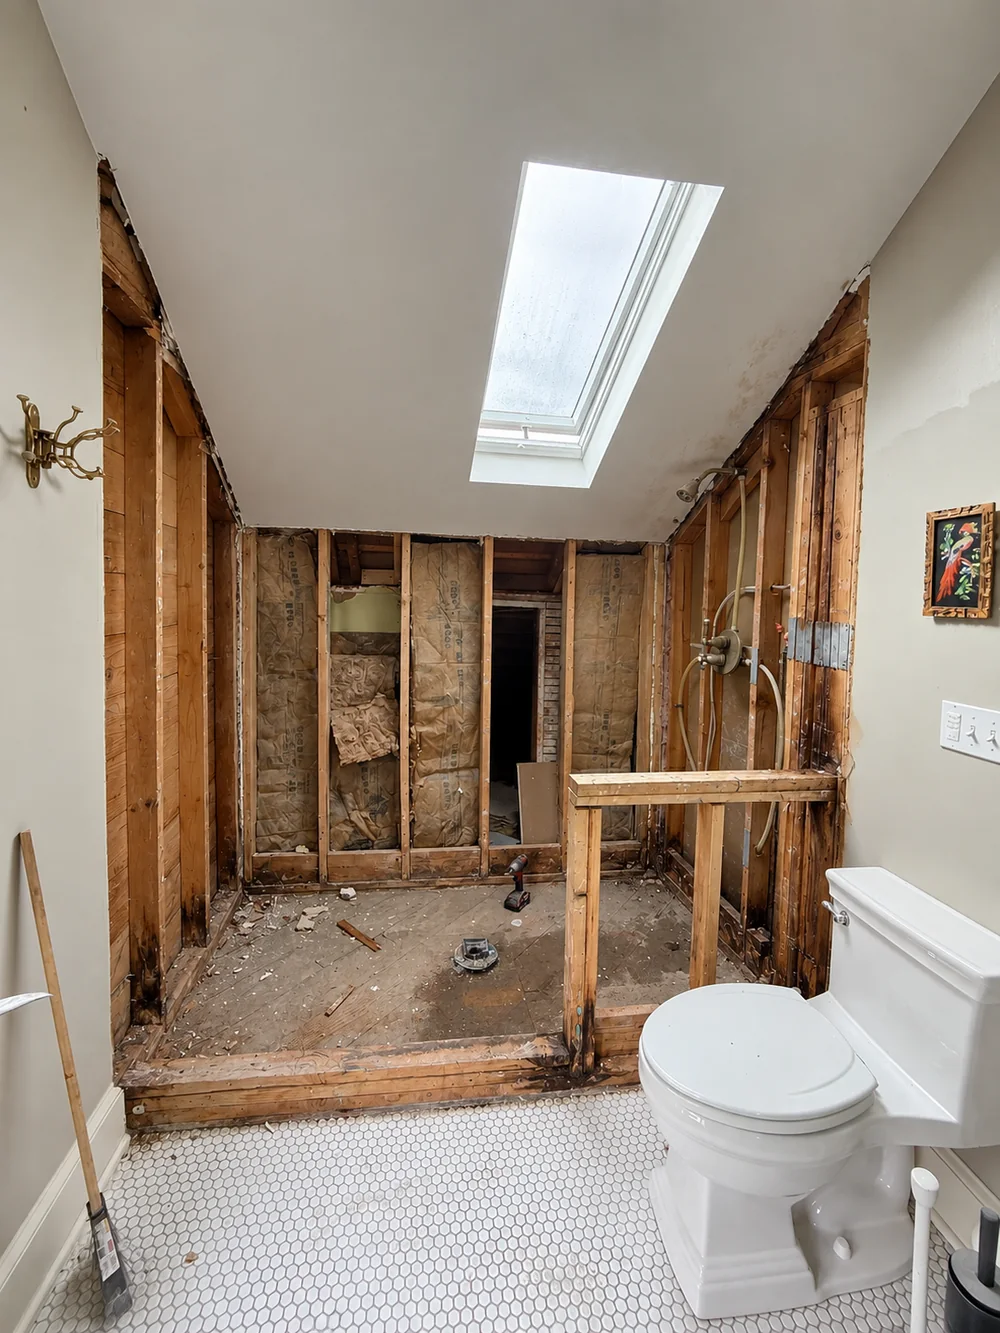 Before After
What you can see from the sidewalk is the last stop the water made, not the first. On a townhome or an attached-garage home, a good stretch of that path runs behind a shared wall or through the seam where a garage roof ties into the house, so the soft spot you can press with a thumb often sits a fair distance from where the leak actually started. Price that off a photo and you are pricing a guess, and that guess turns into a change order the morning the wall actually comes open.
So we come out and get hands on the wood before any number goes on paper. What we can confirm standing at the wall becomes a firm line on the estimate. Whatever depends on what the open wall actually shows gets its own separate line, clearly marked as a possibility, and none of that work starts until you have said go.
Fishers Landing takes its name from Solomon W. Fisher, a Virginia-born settler who filed a Donation Land Claim here in the early 1850s, claiming ground on the mainland and on Government Island out in the Columbia. He left for a stretch to work in eastern Washington and Oregon before returning to that same claim in 1889, and his original riverboat landing, where a ferry once ran out to the island, sat near the base of what’s now 164th Avenue. The landing itself is long gone, but what grew up around that crossing is a retail and transit corridor busier than almost anywhere else on this side of Vancouver, and it’s that newer density, not the original claim, that actually shapes what a rot repair looks like here today.
Pulling the bad material off is the quick half of a rot repair. What actually determines whether we are back at this same corner in another twenty years is what goes back into it.
Matching what is already on the house comes first, and on a Fishers Landing home built in the 1990s or 2000s, that usually means fiber cement lap siding or a cellular vinyl trim run to a specific profile, not solid cedar the way an older neighborhood might have. We start by confirming the exact product and profile already on the wall, since manufacturers have changed their lineups more than once since these communities went in, and a profile no longer made sometimes has to be built up from flat stock to get the reveal right.
Fiber cement itself will not rot, but a lot of the trim, fascia and window casing installed alongside it in this era is still primed finger-jointed pine hiding under a factory coating, and that coating is exactly what gives out around the twenty- to thirty-year mark. Wherever we replace that trim, we step up to cellular PVC or a true fiber cement board instead of putting primed pine back into the same spot, especially at a garage-to-house transition or a shared-wall seam, since those two details see more water than a plain exterior wall ever does.
Framing follows its own rule no matter what the trim is. Anything bearing on concrete or sitting close to grade comes back pressure-treated, because untreated fir against a damp foundation is exactly how the original sill plate failed on a house this age, same as it would on one twice as old. Where we sister a joist or set a new stud, it is Douglas fir, sized and fastened to carry what the piece before it carried, not just enough to close the gap.
Hardware deserves more thought than most homeowners give it. The copper content in today’s pressure-treated stock corrodes an ordinary zinc-coated screw before a single wet season is through, so anything we drive into treated lumber or cedar is stainless steel or heavy hot-dip galvanized instead. Skip that detail and the tell shows up fast, an orange stain bleeding straight through a coat of paint that was supposed to cover it.
Last, every new piece gets primed on all six faces, cut ends included, before it ever goes up. Bare end grain pulls in water faster than any painted face will, and whether that one step actually happens predicts how long a repair holds better than any brand printed on the paint can.
Sizing up what a repair here will cost starts with four things, and you don’t need us for the first two: grab a screwdriver and you can check them yourself tonight.
Does it carry weight? Trim, a water table, the bottom course of siding: none of that holds the house up, so a bad run of it is an afternoon lost and little else. A rim joist, a sill plate, a post base or a deck ledger is different, because the structure depends on it, and that means temporary shoring, lumber rated to carry a load, and a permit filed with the City of Vancouver’s Community Development Department, since Fishers Landing sits inside city limits rather than unincorporated Clark County. The board is rarely what drives the bill. Getting a load-bearing piece out safely, without anything settling while the work happens, is what does.
Second question: has the soft wood actually stopped where it looks like it stopped? Starting right at the obvious spot, drag a screwdriver tip along the board and watch for where it quits sinking in, then don’t trust that point either: keep checking another arm’s length further. Rot runs ahead of the stain every single time, and the number one reason a repair comes undone is calling it done exactly where the paint still looked bad.
Does epoxy ever make sense? Occasionally, and we will say so plainly when it does. A good consolidant can rescue a piece of original millwork that the builder’s supplier no longer carries, as long as the decay sits in a shallow pocket and has not run clean through. None of that applies to anything load-bearing, and it is never a shortcut around opening a wall that genuinely needs it. A contractor offering to pack epoxy into a soft sill plate is quietly setting up your second repair.
And what is actually feeding it from above? That is what decides whether a fix lasts. On a townhome or an attached-garage house, the usual source is a kickout flashing that was never installed where the garage roofline ties into the main wall, a gutter that overflows where two rooflines meet at a shared valley, or a deck ledger with nothing capping its top edge. We find that source and close it before any new wood goes in, priced on the same estimate, because fresh lumber under a leak that is still active just gets paid for twice.
The truth is simple: cost tracks the amount of hidden rot, not the size of the house, and nobody including us knows that amount until the wall is actually open. What we can tell you ahead of that: a job confined to a stretch of trim or a few deck boards lands cheap no matter what. The math changes the moment a joist, a sill plate or a post base turns up soft, because anything load-bearing pulls shoring and a city inspection into the job. More than age or square footage, what actually sets the price is simply how many winters that leak has already gotten away with running, so calling this October beats calling next April.
People are usually surprised by where their money actually goes on a job like this. The board itself is almost never the expensive part. Reaching it is: building safe staging, peeling siding back far enough to see the problem, bracing the load while a bad piece comes out, then closing everything so it disappears. A Fishers Landing townhome adds its own wrinkle here, since a repair that runs along a party wall often means working out access through or past a neighbor’s side yard first, not just walking around your own house, and that coordination adds real hours a standalone lot never would.
Here’s roughly the order the invoice follows: labor leads, then the materials that actually seal the repair against weather again, meaning flashing, house wrap, siding, a coat of primer and paint, then the replacement lumber itself, and a City of Vancouver permit and inspection fee tacked on last if anything structural was involved. Whatever has to come off and go back up along the way, a downspout, a porch light, a mailbox, a stretch of fence, gets listed as its own item, so wood and access never get lumped into one number.
Holding a written number from somebody else already? Hand it over along with your own photos. Most of the time we’ll either land under that figure by 10% or match it exactly, and we’ll put that promise in writing before anything gets scheduled.
10%
Pass that bid along with a picture or two of what you’re seeing, and we’ll get back to you the same day as long as it reaches us before 5pm.
A rot repair is almost entirely exterior work, so day-to-day life inside the house barely changes while the crew is here, whether that house is standalone, half of a duplex, or one unit in a row of townhomes. Here’s roughly how the days break down.
Before anything comes off, we walk the lot together and flag each section slated for removal. Figuring out where the dumpster and lumber pile actually fit takes a little longer on a townhome than a detached house, since a shared driveway or a slim side yard between units leaves less open ground to work with. Whatever’s fragile near that wall, a planter, a light fixture, a hose reel, gets carried clear before the first piece of siding comes down.
Expect a loud morning. Siding and trim come off section by section, and by early afternoon the framing is finally visible, whatever decade’s lumber and flashing is actually back there. Only that open wall tells us whether the contingency we flagged on your estimate was real, not anything we guessed at from the curb beforehand.
If the open wall turns out to hide more than we accounted for, expect a call that same afternoon, not a surprise buried in the final invoice, with photos so you can see exactly what we’re looking at. We wait for your yes before touching anything beyond what you already approved.
New framing and sheathing go in first, then flashing and house wrap follow before anyone on the crew heads out for the day, since an uncovered stud bay sitting through a wet overnight just reopens the same problem. On the rare day a storm wins the race, we tarp the opening, seal every seam with tape, and leave it dry until the front clears.
Siding goes back on, trim follows, then sealant and a first coat of primer close things out. By this stage the house already reads as finished from the street, whether it’s a single-family home or one unit in a row of townhomes, and that’s usually about when a neighbor wanders over to ask who’s doing the work.
The finish coat goes on last. Once the yard is cleared and swept, we walk the completed repair with you, checking it against the estimate point by point. The offcuts, the old rotted wood we pulled, and the dumpster itself all leave with the crew before we call it done.
Press a thumbnail or a screwdriver tip into the spot that’s bothering you. Sound wood resists and barely takes a mark. Wood that’s actually rotting lets the tip sink in with next to no effort and feels soft, mushy, or crumbly rather than solid. On the fiber cement and composite trim common to houses built out here in the 1990s and 2000s, the factory finish can crack or chalk on its own with no rot underneath at all, so the press test tells you more than how rough the surface paint looks. Send a photo and a line about what you found, and anything that reaches us before 5pm gets a reply the same day.
Sometimes that’s genuinely the whole problem, and if it is, we’ll tell you so plainly. What we won’t do is nail new siding over wood that keeps going soft past the spot you flagged. On a townhome, a problem that starts at a shared wall seam or where a garage roofline ties in can travel further than it would on an open, detached wall, since there’s less airflow back there to slow it down. We trace it to where it actually stops before quoting anything beyond what you pointed at.
You hear from us the same day, with photos, before we make another cut. Every estimate we write separates what we can confirm from the outside from what the open wall might still reveal, and that second part stays a possibility, not a charge, until you tell us to proceed. This comes up often enough on a townhome or attached-garage house built in the 1990s or 2000s that we build it into how we quote from the start, rather than let it surprise you partway through.
That comes down to the wording of your specific policy and to what actually let the water in, which makes it a question for your insurer, not for us. Most policies treat long-running wood rot as ordinary wear rather than a sudden loss, even on a house this age, though a specific event, a failed supply line, storm damage to flashing, can change that answer. What we can offer either way is a dated photo record of everything we find as the wall comes open, so you’re walking into any claim conversation with evidence instead of a guess.
We do, any time the scope actually touches something structural. A rim joist, a foundation sill, a post footing, or the connection where a deck ties into the house all carry weight, so fixing one means paperwork and an inspection. For an address inside Fishers Landing, that paperwork goes to the City of Vancouver’s Community Development Department downtown at 415 West 6th Street, not to Clark County, since this ground sits inside the city rather than the unincorporated county around it. Our crew handles the filing and meets the inspector in person. Plain cosmetic trim or siding, nothing load-bearing, typically skips that process entirely.
Timeline depends entirely on what we’re actually touching. Keep it to trim or siding and you’re looking at a single day, maybe a second to finish up. Once a rim joist or a sill plate gets involved, the schedule stretches, since shoring, the city inspection, and drying the opening back in all have to happen one after another, and finish paint needs a real dry window before it sets. A townhome repair that runs along a shared wall can add half a day just for working out access with the neighboring unit. We’ll give you an actual number once we’ve seen the wall ourselves, and we want a phone number that’s live the day it opens, since that’s usually when a decision falls to you.
In most cases, yes. A production builder working this part of Vancouver through the 1990s and 2000s typically ran one fiber cement or cellular vinyl line across an entire phase, so the first step is confirming exactly which product and profile is already on your walls. Current stock from that same manufacturer is usually the closest match, and where a profile has aged out of production, we build a sample up from flat stock and hold it against the existing run in daylight before anything goes on the house.
Not to the carpentry. Solomon Fisher’s original land claim and the riverboat landing it was named for are long gone, and nothing about that mid-1800s history is still sitting behind your siding. What actually matters is the housing that exists now: most of it went up in the 1990s and 2000s as this stretch of Vancouver filled in around the retail and transit corridor at 164th Avenue, and that generation of builder sealant, flashing and trim is the thing actually reaching the age where it starts to give out.
Evergreen keeps its shop at 505 SE 184th Avenue, a few minutes from Fishers Landing on the same side of Vancouver, so a job here costs us no real drive time. Fishers Landing is a neighborhood inside Vancouver’s city limits, not a separate town, built up around a real retail and transit corridor on SE 164th Avenue: Fisher’s Landing Plaza at 164th and SE 15th anchors shopping with Fred Meyer and Trader Joe’s, and C-TRAN’s busiest transit center sits just off that same stretch. We cover the whole area, from the townhome rows and newer single-family streets of Fisher’s Creek and its Hiddenbrook pocket to The Village at Fisher’s Landing north of Highway 14, and the rest of this side of the city toward Mill Plain. Because Fishers Landing sits inside Vancouver’s city limits, structural permits run through the City of Vancouver’s Community Development Department at City Hall, 415 West 6th Street, not Clark County. Washington licensed, WA Lic. #EVERGRS757MC.
Three of the 50 reviews on our Google profile, in the homeowners' own words.
David's work was terrific. Repaired a rotted out structural framing issue in a bathroom and replaced (and resized!) a window in the same space. He initially quoted a two day job but was able to finish in a single day. Dedicated! Will be using him again.
Joe H.Bathroom framing repair
We talked to 4 different contractors and only David, of Evergreen, took the time to climb up to our roof to check out the job. The others gave us bids based upon a photo. Evergreen was not the cheapest but the extent of the work they did was worth every penny.
Steve K.Roof and exterior work
Evergreen crew installed three skylights for us. Once we opened the ceiling there was more to do than expected and they handled it without drama. Clean work, fair price, and they cleaned up after themselves.
Foad M.Three skylights
Send photos and a short description. If it arrives before 5pm you get an answer the same day.
Already have a written estimate from someone else? Send that too. We match or beat most estimates by 10%.
Built for the wet side of the river.

Licensed and insured remodeling contractor serving Vancouver, WA and the Portland metro.
Oregon CCB #262707 · WA Lic. #EVERGRS757MCEvergreen Renewal Services LLC
505 SE 184th Ave Unit 320
Vancouver, WA 98683
© 2026 Evergreen Remodeling. Oregon CCB #262707 · WA Lic. #EVERGRS757MC. Evergreen Renewal Services LLC. All rights reserved.
Same day response on anything sent before 5pm.